Alchemy is a collection of independent library components that specifically relate to efficient low-level constructs used with embedded and network programming.
The latest version of Embedded Alchemy[^] can be found on GitHub.The most recent entries as well as Alchemy topics to be posted soon:
- Steganography[^]
- Coming Soon: Alchemy: Data View
- Coming Soon: Quad (Copter) of the Damned
Pointers are one of fundamental topics related to programming that can be quite confusing until you develop your own personal intuition for what they are and how they work. Passing on this intuition is also a difficult task, because once the more experienced developer finally understands pointers, they seem to entirely forget what was so confusing in the first place.
I will attempt to pass on the intuition I have developed for using pointers in C and C++. The metaphors and explanations that I use are based on a number of attempts to help beginners struggling with concepts. Each of whom now have a better understanding of these confounding constructs. Even if you are completely comfortable with pointers, maybe I can possibly give you another approach to help better explain these fundamental tools to others.
This post will introduce pointers and the syntax for interacting with them. I will write a follow-up post that addresses more complex things that are done with pointers, such as creating data structures and using function-pointers.
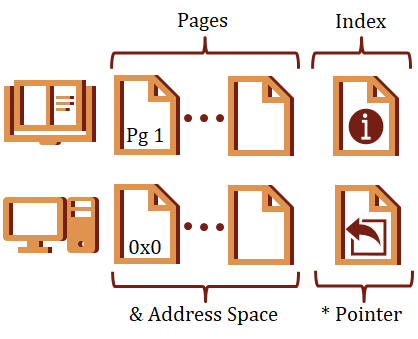
Analogy: Computer as a Book
I want to start with an analogy. Think of your program as a book. The pages are like memory addresses, and the content on each page is the data.
A pointer in this context would be an entry in the index. The name of the entry is similar to the name of your pointer. This entry takes up space in the book, but the entry itself does not contain any data. Instead, it contains a page-number (address) where you can actually find the data related to this index entry.
You cannot access the data the index refers to directly from the index itself. Rather, you must first dereference the index (pointer) by navigating to the page (address) indicated for the entry.
Data
With computers, there are two ways to reference data, directly and indirectly.
Direct references are to variables that refer to data that is directly associated with the storage location for the variable. These types of variables have been statically allocated, which means they are local variables allocated on the stack, global variables, or variables that have been declared with the static qualifier. To keep things simple, I will only use local variables in the code examples.
Addresses
Indirect references do not have storage associated with the data to be accessed. Instead, we have a variable that points to the storage location. The storage location is a memory address on the computer. Essentially, a pointer is a variable that stores a memory address. Pointers, References, and even Arrays are all forms of indirect data access. This post focuses on the Pointer.
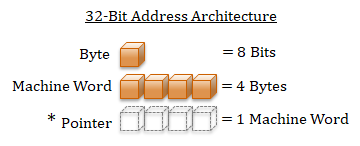
A computer address requires a value that is the size of a machine-word. The machine-word size can be deduced by the target machine's architecture. For example, a 32-bit architecture has a word-size of 32-bits. Virtually all modern architectures use an 8-bit byte. Therefore, a 32-bit architecture has a machine-word size of 4 bytes. Since a pointer is a variable that holds an address, a pointer will be the same size as the computer's machine-word.
Pointer Initialization
A pointer must be initialized before it can be dereferenced. Dereferencing an uninitialized pointer is considered undefined behavior, which basically means your program won't work. There are two things that you can use to initialize a pointer, 1) a valid address in your program, 2) NULL or 0. NULL is defined in both C and C++, but it is generally advised to not use NULL because it is not defined portably across different systems. Instead, you should use the value 0.
One note of caution, Operating systems typically do not map data at the address 0x0. However, 0x0 may be a valid address on some resource constrained bare-metal systems. Therefore, take the time to learn the details for each system on which your programs will execute.
A new literal value for pointers was added to C++ 11 called, nullptr. This is a safe and portable value that can be assigned to a pointer to indicate that it does not reference anything valid. If you are using newer versions of C++, this is the recommended value to assign to empty pointers..
Pointer Notation
Let's review the different types of syntax that can be used to interact with pointers. The operations include the ability to take the address-of a data location, dereference a pointer to its data location, and even accessing members of complex data structures.
Address-Of Operator &
The & becomes the address-of operator when placed in front of a variable. Use this operation to create a pointer to variable. This is a fundamental operation that is used to assign indirect storage to pointers and pass local variables to functions that expect pointers.
C++
char buffer[] = "2147483647 is 2^31 - 1"; | |
char* p_end = 0; | |
| |
// Convert the text string to a number. | |
// The last character parsed is returned in p_end. | |
long value = strtol(buffer, &p_end, 10); | |
| |
long p_long* = &value; // The address where value is located | |
// is assigned to the pointer |
Indirection Operator *
The * is the dereference operator when placed in front of a pointer. This is how to access the underlying data referenced by the pointer. You must dereference a pointer if you want to access the data for both reading and writing to its indirect storage location.
C++
char* strcpy(char* dest, const char* src) | |
{ | |
// Copy each character from src into dest | |
// until the terminating NULL is found. | |
char* cur = dest; | |
// Dereference src to read its value | |
while (*src != 0) | |
{ | |
// Dereference src to read its value for assignment | |
// to the current location of the dereferenced cur. | |
*cur = *src; | |
// Advance the location pointed to by | |
// both of these pointers, i.e. next character. | |
cur++; | |
src++; | |
} | |
| |
// Copy the final NULL termination. | |
*cur = *src; | |
| |
return dest; | |
} |
Member Access Operator ->
Structs and classes collect a set of member data and functions into a single construct. If you have a pointer to an object and want to access one of its members, you will have to dereference the object pointer before you can access the members.
C++
struct Entry | |
{ | |
int key; | |
int value; | |
}; | |
| |
Entry* p_entry = new Entry; | |
(*p_entry).key = 1; | |
(*p_entry).value = 100; |
This syntax is a bit cumbersome. There is a member access operator that can indirectly reference their members ->.
C++
Entry* p_entry = new Entry; | |
p_entry->key = 1; | |
p_entry->value = 100; |
Subscript Operator [ ]
Arrays provide a convenient method to refer multiple data locations through a single variable. Arrays are pointers dressed up in disguise. The same notation used to access an index in an array can be used with pointers to access an element offset from the base address of the pointer.
C++
// Allocate a block of 10 integers | |
int* p_ints = new int[10]; | |
| |
// Remember, zero-based indexing in C and C++ | |
p_ints[0] = 1; // Assign 1 to the first element, which is | |
*p_ints = 1; // equivalent to this operation | |
| |
p_ints[1] = 2; // Assign 2 to the second element | |
p_ints[9] = 10; // Assign 10 to the tenth element |
Notice how the pointer indirection is automatically handled when the subscript operator is used. To be clear, an array and a pointer accessed with the subscript operator are two different things. The array is located at the same address as the variable's storage. On the other hand, the pointer contains an indirect address to the storage. When the subscript operation is used on the pointer, its address is first dereferenced before the value is indexed. You can test this with the sizeof operator to report these size of the variable in question.
C++
int array_ints[10]; | |
int* p_ints = new int[10]; | |
| |
size_t array_size = sizeof(array_ints); // 10 * size of int (4) = 40 | |
size_t pointer_size = sizeof(p_ints); // word size = 4 |
Although the array has storage associated with its variable, if the array is used directly without a dereference operation, the address of the array is returned. In essence, the array is a dressed up pointer. However, you cannot assign a new pointer to an array variable. When you pass an array as an input parameter to a function expecting a pointer, it is implicitly converted to a pointer. This is also true if you attempt to declare a function with a parameter that is an array. You can learn more about that from a previously written post on Type Decay[^].
Pointers to Pointers
Sometimes it is useful to hold a pointer to a pointer. If you wanted to declare a variable to hold a pointer to a pointer, it would look like this:
C++
char value = 0; | |
char* p_value = &value; | |
// Declare a pointer to a char pointer | |
char** pp_value = &p_value; | |
| |
// A double indirection is required to read the | |
// actual value stored at the final address. | |
char data = **pp_value; |
There two reasons that I can think of to use multiple levels of indirection. The first is to make call-by-reference functions calls with pointer variables. Call parameters for functions in C can be either call-by-value or call-by-reference. Call-by-value places the value of the variable on the call stack, whereas call-by-reference places the address of the variable on the call stack. You use call-by-reference when the called function will modify the call parameter passed to the function. In the case of the strtol example, a pointer to the first character after parsed number is returned.
Call-by-reference is especially valuable when you have more than one value that you would like to return from a function.
Here is an example of double-indirection by a function that allocates a new buffer to copy the contents of a string. The second level of indirection is required so the caller can receive the updated value of the pointer, which points to the newly allocated buffer.
C++
// Allocate a buffer to hold a copy of the input string. | |
// The number of bytes allocated | |
size_t CopyString(const char* input, char** output) | |
{ | |
size_t len = strlen(input) + 1; | |
| |
*output = new char[len]; | |
strncpy(*output, input, len); | |
| |
return len; | |
} |
The other reason is to dynamically create an array of pointers. For that matter, even a statically allocated array of pointers has double indirection. An array of pointers could be used as a container for other dynamically allocated variables, or a function-pointer table. I will discuss function-pointers in the follow-up post to this article.
Pointer Arithmetic
The final concept that I want to introduce in this post is pointer arithmetic. It is commonly used. It is also easy to mess up if you aren't paying attention. I think it is important to walk through this concept to help you from being surprised when you work with different pointer types in this context. The pointer type supports basic addition and subtraction, which also includes the increment ++ and decrement -- operations.
Using the subscript notation is a simply a different form of performing pointer arithmetic, followed with indirectly referencing the data at the specified index. A pointer is an indirect reference to a specific type. Whether it is to one of the fundamental types, an object or even another pointer, this referenced type has a size associated with it. Adding one to a pointer will increase its value by the size of its referenced type. Similarly, subtracting one from a pointer will reduce its value by that same size. Therefore, the subscript operator intrinsically performs the pointer arithmetic to identify the location of the index from the base pointer.
C++
int* buffer = new int[10]; | |
// ... Populate the contents of the array | |
| |
// These two statements are equivalent | |
buffer[4] = 101; | |
*(buffer+4) = 101; |
Be cautious when performing pointer arithmetic, because if you attempt to calculate an offset with the wrong type, the wrong type-size may be used in your calculation. This is most likely to happen when you are converting data between types, such as reading a message from network communication.
Finally, you cannot perform pointer arithmetic on a void*. This pointer type is an intermediate type that must be cast to another type before it can be dereferenced or indexed.
Deduce Its Type
When you are wading through a morass of pointer code, I find it useful to deduce the type for variables with lots of indirection. Especially pointer logic that is iterating through the elements of a buffer.
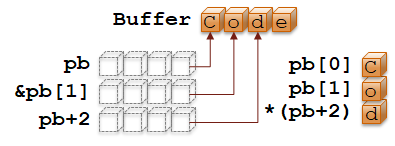
We will deconstruct the types from this snippet of code:
C++
char Buffer[] = "Code"; // Statically allocated char array | |
char* pb = Buffer; // char* points to first buffer char | |
char b0 = pb[0]; // Dereference char* becomes char, 'C' | |
| |
char b1 = pb[1]; // Dereference char* becomes char, 'o' | |
char* pb1 = &b1; // then take address results in a pointer. | |
// Equivalent to this: &pb[1] | |
| |
char* pb2 = pb+2; // Add char slots from base pointer, | |
// results in a new pointer | |
char b2 = *pb2; // Dereference points to 'd' | |
// Equivalent to this: *(pb+2) |
Let's do one more. This time a bit more complex:
C++
// Create two strings, | |
char* pHello = new char[6]; // This one is dynamically allocated | |
strncpy(pHello, "Hello", 6); | |
| |
char pWorld[] = "World"; // This one is statically allocated | |
| |
char** ppStrings = new char*[2]; // Allocate an array of char* | |
// This is a pointer to a char pointer | |
ppStrings[0] = pHello; // Let's associate pHello with the first index. | |
// We dereference the first pointer | |
// This gives us a char* pointer. | |
// Now we can assign pHello | |
ppStrings[1] = pWorld; // The same applies to the second string. | |
| |
// For cleanup, must delete 2 allocations | |
delete[] ppStrings; // Be sure to use [] version of delete | |
delete[] pHello; // Same for pHello. | |
// pWorld was not dynamically allocated |
Summary
Pointers are essential to perform many operations in C and C++. Arrays are basically pointers in disguise. The indirect nature of pointers can lead to confusion, and the difference between the size of the pointer and the size of its type can lead to confusion. I showed in this article how you can successfully manipulate pointers by identifying the type of variable you are working with before performing any operations. In the next part, I will tackle some more complex topics related to pointers, which includes data structures and function-pointers.
This post introduces the concepts and vocabulary related to quad-copters, and overview of what is involved from an embedded software perspective to build one of these flying contraptions. Progress will be documented as incremental steps in posts that follow.
Introduction
As part of my coursework in the pursuit of a Masters degree in Cybersecurity I took a course called Software Engineering for Real-Time Embedded Systems. The course focused on the concepts and challenges that are encountered when developing software for systems that have hard real-time deadlines for the system to function properly. The homework was a series of projects that led up to the development of a quad-copter with streaming video.
Many of the developers that I follow on Twitter have asked for resources on how to get started with embedded development. I thought this would be a great project to build and document the process for those of you that are interested in learning what is required to create one of these machines. I plan to build a general-purpose drone that is suited for aerial-photography with longer-than-average flight-times. However, the software that I develop can be adapted to all types of multi-rotor air-vehicles. This means that by changing the components such as frame and motors, you could easily build your own drone suitable for FPV racing.
There are plenty of pre-built and DIY (do-it-yourself) kits available to amateurs and enthusiasts. If I simply wanted to fly model aircraft I would purchase one of these kits and I wouldn't be writing this series. My chosen career is Software Engineering and it just so happens that is also my hobby. While I will be using the same components found in the DIY kits, I will be foregoing the flight-controller. Instead, I will be designing and documenting my journey as I develop this controller and integrate it with the drone. If you aren't interested in writing your own flight controller from scratch, you can still build a drone based on an embedded controller and use the open-source software Ardupilot. This development for this software is definitely active and contains support for many different types of air-vehicles. Alternatively, you could purchase a flight controller circuit-card that has all of the required functionality built into the hardware.
I will definitely cover all of the software aspects required to build a drone for yourself. I also plan to write some entries that will be of interest to you if you are interested in embedded development. For example, reading component data sheets, setting up interrupts and other aspects important to real-time embedded development.
What is a Quad-copter?
A quad-copter is considered a multi-rotor air-vehicle. Other common multi-rotor configurations include 3, 6 and 8 rotors. Four rotors provides a relatively stable configuration that is symmetric and won't be as expensive as the 6 or 8 rotor configurations.
There are two other types of radio-controlled air-vehicles common with hobbyists.
- Fixed-Wing (Airplanes):
These are relatively efficient craft that allow for much longer flight times. However, they typically require a large amount of setup/teardown time when moving to the flight zone, and these craft require large open areas where the craft can maintain constant forward momentum to create lift over the wings.
- Rotary Wing: The Traditional Helicopter
This is a single-rotor aircraft. The flight direction is controlled by changing the attitude of the main rotor and a secondary tail rotor is required to counteract the gyroscopic rotation caused by the primary blade.
Gyroscopic Rotation
I mentioned that a traditional helicopter requires a tail-rotor to counteract the gyroscopic rotation introduced by the primary blade. A quad-copter is subject to the same forces as its rotors spin. To counteract this effect, we will spin two of the motors clockwise and the other two motors counter-clockwise. At this point I do not know if it matters which motors that we command to rotate in each direction. Unless I find a definitive reference or someone comments with the definitive answer, this seems like something worth experimenting with when I reach that point.
This is the rotation configuration that we will start with as we work towards the final quad-copter:

Rotation Orientation
We will alternate the direction of rotation for each motor
How does a quad-copter change direction?
The four rotors on a quad-copter allow for a relatively stable and very maneuverable aircraft. A quad-copter has 6-degrees of freedom in movement, 1) up, 2) down, 3) left (port), 4) right (starboard), 5) forward, and 6) backwards (aft). Additionally, the craft is also capable of hovering in-place and rotating in both the clockwise and counter-clockwise directions.
Attitude
A different set of terminology is used in navigation of ships and aircraft, and I will be using these terms moving forward.
Thrust
This describes the overall rotation speed of the rotors. Thrust adjusts the relative speed of each rotor equally. Therefore, if the thrust is increased, the speed of the rotors will increase and the air-vehicle will ascend. Alternatively, if the thrust is decreased the air-vehicle will descend. Assuming the air-vehicle is in the air, if the thrust is left at a steady neutral position, the vehicle will hover in place. This will require the calibration and selection of the hover level for thrust. The hover level is the neutral thrust level.
Roll
This causes the craft to rotate either to the left or the right. This rotation will cause the drone the move to the side as well. To introduce this motion the two rotors on the side in the direction of the roll should be reduced, while the rotors on the opposite side are increased.
Pitch
This causes the craft to move forward or backward by rotating the orientation of the craft. Again, to introduce this motion the rotors on the opposite side of the desired direction of movement should be increased.
Yaw
This is the rotation of the craft around the vertical access. The gyroscopic forces of the spinning rotors are used to control this aspect of flight. Two of the rotors spin clockwise and two spin counter-clockwise. Increasing the speed of the clockwise motors relative to the counter-clockwise motors will induce a force that causes the craft to yaw to the right (clockwise). The craft moves in the opposite direction when the rate of the counter-clockwise motors is increased relative to the clockwise motors.
Components
The list below contains a description of the components that are required to build a basic quad-copter / quad-rotor. I have also included the parts that I am using for my build.
Frame
There are many types of frames, built with a variety of materials such as wood, plastic and carbon fiber. It is important to get a frame that is light and well-balanced. I chose to work with the Tarot - IronMan 650, which is built from carbon fiber. This frame collapses easily to make it more portable. It has a solid core with two plates to protect the internal components. This frame was about 100 dollars. It is a larger frame, so it is not suited for FPV-racing. I am more interested in developing a platform that I can additional sensors to perform interesting tasks remotely.

Tarot IronMan 650
Motors
Multi-rotor copters typically use outrunner type motors because of their high efficiency. Outrunners are a type of motor where the internal coil is mounted fixed and the entire brushless outer bell-housing rotates with the shaft, attached to the propeller. Motors are rated by a unit represented as KV. This means Kilo-rotations / Volt. Typical batteries run at 12 volts. Therefore, the 1000KV motor would rotate at a top speed of 12000 RPM.
I selected the Turnigy - Multistar Elite 4006 740KV motor for my drone. This is a slower motor at 740KV that has a larger number of magnetic poles to produce more torque. I will pair this with a steeper pitch of propeller to create a drone that can handle a heavier payload with the additional sensors that I will eventually add. The specs for these motors indicate they are capable of handling from 10" to 17" rotors. To start with, I have selected 11" carbon-fiber rotors. If you are purchasing equipment to build your own drone, I suggest you order extra rotors. Because you will break a few before you attain stable flight.

Turnigy - Multistar Elite 4006 740KV
Electronic Speed Controller (ESC)
The motors are ultimately controlled by an Electronic Speed Controller (ESC). They are colloquially called "Escapes". The motor is controlled by 3 input wires, which the ESC uses to adjust the voltage across the different wires to cause the motor to spin. The controller side of the ESC has two wires that the flight controller uses Pulse-Width Modulation (PWM) signals to signal the desired speed. I will elaborate on the ESC in later posts when I describe its integration with the flight controller.
Most ESCs are designed to support a single motor. These ESCs are attached to each arm of the multi-rotor so they can connect to the flight controller in the center of the frame, and the motor on the edge of the arm. A separate ESC is required for each motor. This electronic component is one of the most important elements of your drone. So don't go cheap on this component. ESCs are rated by the current that they control. I have seen ratings in increments of 5A and 10A. I would go one level greater than the rating of the battery that you plan to use. ESCs can support additional features to protect the other electronics in your system, such as a low-voltage protector for your lithium-polymer battery. These features are often programmable.
When searching for the ESC that I wanted to use, I discovered a 4-in-1 module that is installed at the center of the drone and supports up to 4 motors. This module also has a Battery Elimination Circuit (BEC) that can be used to power a 5 volt flight-controller. I chose the Q Brain 4x25A Brushless Quadcopter ESC. I wanted to simplify the circuitry that I would have to create for the drone. I am more interested in the software that plan to write than the physical circuits that are created.

Q Brain 4x25A Brushless Quadcopter ESC
Lithium Polymer Battery
The current drones are powered by Lithium-Polymer (Lipo) type batteries. They are very dense and can store quite a bit of energy. There are a few metrics used to rate these batteries:
Current Output Rate (C)
Lipo batteries are rated by the rate of current that can be drawn from the battery. This quality will be indicated with a "C" in the battery description. For example, a battery that is capable of sustaining a current of 10 amps will be marked 10C.
Total Stored Power (mAh)
The amount of energy contained in a fully charged battery is indicated in milli-amp hours (mAh). Smaller batteries may only contain 100 mAh, while the types of batteries used to control a multi-rotor drone store between 2500 mAh to 12000 mAh. This rating typically determines the amount of flight time you will get per charge. I don't know if there is a calculation to approximate your flight times. I will be sure to post it if I run across one.
Number of Cells (S)
Most entry-level drones uses batteries with 3 cells. When you read a batteries rating, it will indicate the number of cells with an "S". Therefore a 3 cell battery will be described as 3S. More cells generally means more stored power to provide longer flight times or support a stronger current draw.
I will be using a Turnigy MultiStar battery rated at 5200 mAh 4S 14.8V @ 10C. note: I couldn't find an image to match the rating of the battery that I purchased. (I also didn't look that hard).

Turnigy MultiStar Battery
Inertial Measurement Unit (IMU)
This is the most important sensor on a quad-copter. This sensor is also found in smart phones. An IMU contains a collection of accelerometers and gyroscopes to deduce the orientation and current motion of your drone. The absolute orientation of the drone can also be determined by locating magnetic North when the IMU contains a magnetometer. All of these sensors are typically packaged into a relatively inexpensive MEMS unit and integrated on a circuit board. The processor board that I selected is designed for robotics applications and it contains an IMU. If you want to use a different processor board, you can pick up an inexpensive IMU from AdaFruit.
Radio Transmitter / Receiver and Controller
To control the drone, you will need a radio transmitter and receiver pair. The most straight-forward solution is to simply buy a RC controller from a hobby shop or online. The transmitter is typically a controller with a channel selector and joysticks. The radio receiver is a small component that integrates with the Analog-Digital Converters (ADC) of your processor board to read the signal levels for each control.
While I initially develop my drone, I am going to use a standard 802.11 wifi network that connects my tablet to the wifi radio in AP mode on the flight controller processor board. I capture the control inputs with an Xbox 360 controller. Using this method allows me to capture useful information and display it on a display on my computer on the ground while I am testing. This wifi link will also facilitate streaming of live video once basic flight is achieved. We can go back at any point in time and integrate support for a traditional RC controller if desired.
Flight Controller
This control board is the component that coordinates all of the information required to make a multi-rotor drone capable of flight. As I have already mentioned, many flight controllers exist and can be purchased just like all of the other components that I have mentioned. Except, that is not why we are here. We are going to explore the embedded world, and take on the challenge of developing our own flight controller.
I originally planned to use the BeagleBone Black. This is a very cool open-source prototype board that has lots of capabilities related to embedded systems development. It is very similar to the Raspberry Pi. The BeagleBoard runs an image of Debian Linux. I really enjoy working on these boards, because I can eliminate the need for setting up a cross-compiling toolchain. I compile the BeagleBoard's software directly on the BeagleBoard. I will add another post soon to help get you started with this platform.
Finally, this board requires a 5v power-supply. When I first assembled the drone, this configuration was great, in that I was able to use the 5v BEC from the ESC controller to power the Beagle board. But then...
I discovered the recently released (March 2017) BeagleBoard Blue. This is a version of the board is specifically designed for robotics applications. It contains an embedded IMU, and a wifi radio. This meant that I would no longer have to integrate those two components into the drone as they would be contained within this single board. However, this board requires a 12v power supply, or a 2 cell battery. I will be powering the flight controller with a separate 2 cell battery.

Beagle Bone Blue
Summary
That covers the basic concepts of a quad-copter and hardware that I plan to start with. The next few posts will focus on getting started with the BeagleBone processor board and developing basic electronics projects. This will set the stage to integrate all of the components I described in this post. The final goal is to have a working quad-copter with supporting software that is ready to be expanded for custom purposes. The software will be available from GitHub. So if you are interested, check back soon. Follow me on Twitter to receive tweets when I post new updates.
When you know nothing, it's easy to think you know everything
I haven't yet decided if I think this is a universal flaw among people or that it is a trait more prone to the practitioners of our profession; I am referring to the absolute mentality that so many people seem to use when making decisions. This is a closed-minded approach to solving problems. This is the basic concept:
"There is one absolutely best practice, and you are an idiot if you don't subscribe to the same approach that I take."
It is important to leave your comfort zone to expand your abilities. You can increase your potential by learning to spot this cognitive bias, recognize when you are limiting your potential by falling prey to it, and learn to evaluate objectively as you make decisions in your day-to-day activities.
Ignorance
I do think Ignorance is Bliss in many ways. When you are unaware of politics, current world conflicts, or the unfair business practices of large corporations, there is less for you to worry about. In most cases, you couldn't do anything to resolve these issues by yourself anyway. Regardless, this post is about something a bit more focused, willful ignorance.
Willful Ignorance
Willful ignorance is what I believe most people mean when they call someone else ignorant. Ignorant by itself, simply means "lack of knowledge, education or awareness." It's not an inherently negative state of being. We are all ignorant of programming concepts when we first start our careers. Along with "best" practices, the "best" tools and the "best" coding styles. As we learn skills and become informed, we shed that state of ignorance and become capable of making more informed decisions for our daily activities. However, to reach this point requires a conscious active effort to increase one's knowledge. Willful ignorance is when a person actively stops acquiring new knowledge.
Expert Beginner
I will admit that I have trapped myself in that state of being before, multiple times actually. The first occurred when I first started programming and I reached a level of skilled commonly referred to as "Expert Beginner". This is that level when developers are quite dangerous. They are capable enough to accomplish things, but still quite ignorant of the world of computing. I remember feeling all-powerful. I mean, just a year earlier I knew zero programming concepts and now I could program in multiple languages and I was even commanding a computer to drive CNC milling machines. Also, consider that I had no difficulty developing code for the same type of problems that were disguised in different forms. I stopped running into new challenges, and mistakenly believed there wouldn't be any others.
It took a mix of observing other co-workers exhibiting similar behavior and the exposure to more complex concepts in my college courses to realize how little I actually knew. It's an easy trap in which to fall prey and it doesn't have to be permanent. It wasn't for me because I was actively pursuing knowledge and continued to seek growth. I will describe the other time I became ignorant of better ways later in this post.
Limited Perspective
A limited perspective provides limited choices.

It's that simple.
Have you ever run across a piece of code that just didn't seem to fit? Or you are trying to put together a solution but everything you try feels like it should be much simpler than your solution? That may be your intuition trying to guide you to that simpler solution. Since you don't currently see any better solution, take a step back. Go for a walk even.
While on your walk, don't think about the problem. In fact, don't think about any problems. Let your mind wander and relax. You may find that idea your intuition had in mind bubbles to the surface before you make it back to your desk. If not, no worries. With a clear mind, return back to your problem and seek out a new perspective.

Chalk Art by Kurt Wenner
I believe it is important to experiment, especially as a programmer. Hopefully you are able to find the time to explore here and there, to discover different approaches to solving problems.
Prototypes
Create a prototype solution the next time you design a feature. This is how you can explore the possibilities without giving up your nights and weekends. This will also give you a better understanding of your solution when you are ready to implement the real solution. You may think that you are too busy. Try it! You will surprise yourself.
This code truly should be proof of concept. Quick and dirty to test the feasibility of an approach. To help with this, consider using a different context for naming your objects to make it less tempting and convenient to paste your prototype into your production implementation. I will often create my prototypes in a unit test harness. This allows me to create multiple, small test scenarios to use my prototype while I try to understand the problem space.
Prototypes also give you the opportunity to experiment with features of a language or a library of which you recently learned. You should spend a minimal amount of time experimenting to determine if there are merits to this feature for your current problem. If it turns out to be a good fit, fantastic! However, even if it is not a good fit for your current problem, you may gain insight to the types of problems you could solve with this feature in the future. Most importantly, don't view prototype development as wasted time and effort. Even if your prototype fails to provide value, you have still learned something and gained experience; that is invaluable.
Unit-Test Harnesses
It's no coincidence that I embraced prototyping when I started to embrace the concept of unit testing with a test framework. Unit test frameworks provide a harness to execute and observe your prototype code. If you have setup your environment so that creating new test harnesses are effortless, it becomes effortless to explore ideas in the form of prototypes. Another advantage of this approach is that the code remains segregated from your main project. Therefore, the temptation to incorporate this experimental code into your main project is minimized.
Read Someone Else's Code
Starting a new programming solution from scratch is an exciting prospect. You get to work from a clean slate, and create your solution. Working in a codebase that was written by someone else. Well, that just sucks. However, there's much to be learned from an existing code base. Especially if the program works.
If the program works, that means the previous developer did something right. It's easy to jump into unknown code and criticize it.
"What the hell where they thinking?"Consider this, what are you possibly missing? Although the software may not be perfect, it probably has some redeeming qualities. For legacy code, these qualities may be hidden beneath the years of maintenance additions that have compromised it's original architectural integrity. So how does it work? Learning to read and understand new code is extremely valuable.
Pro Tip:It's easier to understand new code if you don't judge it while you are reading it.
If you find it difficult to not judge the code in which you are stuck working, then spend a little time dissecting and understanding an open-source library that you admire. For example, something from Boost.org. Take a little bit of time to play around with the library. Possibly even create your own simplified version of it, while emulating the techniques used to implement the library.
The key theme in all of these techniques are they are different ways to practice and explore something new.
Absolutely
There is are no silver bullets, or killer strategies that will always work. Best practices, sure. These are strategies that usually lead to successful implementations. But remember they may not provide for the optimal solution, or even a useful solution. Best practices are the greatest common denominators for practices to guide developers that range from expert-level all of the way to beginner.
Use a healthy dose of skepticism for every guideline you apply to your code. Generally, the guideline is valid and should be used. That is, until it's not.
Expert Beginner, Part 2
The other time I realized that I had become an expert beginner, was just a few years ago. I have had the opportunity to utilize a wide variety of algorithms after nearly two decades of programming. What I found, was that I basically resorted to the same small set of algorithms and data structures. That's because they were good enough. The problem is they were good enough for most situations. Because I had acquired a small list of algorithms that I depended on, I ignored all of the other possibilities that existed.
I returned to college to work on a masters degree. The program I chose had a required class "Foundation of Algorithms". I thought this will be boring because I took this as an undergraduate. I also considered getting a waiver for the class. I am glad that I didn't, because it opened my mind and reacquainted me with many of the concepts that I had tossed aside. I still go to my favorite list of algorithms, but not before considering the criteria required to solve the problem at hand.
As an example, consider the binary-search tree (BST). The red-black tree is a great implementation of this data-structure because it is self-balancing. Therefore, you have a solid general purpose binary-tree that gives you O(log n) performance for search, insert, and delete. Many implementations of the C++ Standard Library use a red-black tree to implement the std::map.
There is another type of self-balancing BST called, AVL tree (AVL are the initials of the authors). This tree also provides O(log n) performance for the three main operations of a BST. One is just as good as the other, right? The difference between these two trees is in how the tree is balanced. The AVL tree uses a stricter algorithm that keeps the height of the tree to a minimum. Therefore, it performs better in situations that rely heavily on search operations.
The red-black tree is still the better data structure for general-purpose use, because the balancing algorithm is more efficient than AVL's algorithm. This high-lights the trade-off that we need to make when selecting between the two data-structures. If our data is typically loaded once, then primarily searched, the AVL tree would be the better choice. However, if the data in the tree is fairly dynamic with insertions and deletions being at least as likely as a search, then the red-black tree will be a better choice. Of course, if the data-set remains small, then they type of tree may not matter at all. Each situation is unique, and should be analyzed.
Just Follow the Path, It Will Take You ... Somewhere
Selecting the best algorithm becomes a set of choices between the trade-offs. In my case, I quit analyzing the situation and simply reached for the correct class of algorithm.
This led me to the realization that lists of best practices or development methodologies are designed to guide developers to a good solution in most circumstances, without the requirement of giving much thought. "Just follow the steps down the path, you'll know when you get there..."
For a while, I thought this was a good thing. Someone has distilled this list of best-practices so I don't have to think about the minutiae, I can focus on the problem at hand. The problem is, we tend to lump all types of development together. What works well for website development probably will not be compatible with development of embedded hardware in highly regulated industries. And as these two types of development diverge to their extremes, the differences only become greater, e.g. high-demand websites on distributed server-farms vs. safety-critical embedded controllers for commercial aircraft.
Another way this manifest itself is with methodologies, such as the Agile method. Actually, not the Agile method itself, but how it is practiced, very rigidly. The point of being agile, is to being open to adapt to changes gracefully. It may be that a certain aspect of the SCRUM process does not fit well with the team or the way products are developed at your company. You should evaluate what doesn't work and modify it for your needs, or possibly even eliminate it. Strictly adhering to a process because that's what the expert's say is, well... willfully ignorant.
Summary
Originally, I started this post as a rant against the absolute mentality that many people use with work and maybe even life. Then as I wrote, I thought it would be more constructive to help others identify this mind trap, and avoid it. It happens to all of us. The thing is, you don't have to stay in that spot. Following guidelines or a methodology are not excuses to mentally checkout. If something doesn't make sense, try to understand it and change it if necessary. Otherwise, you run the risk of becoming an expert-beginner with no path for growth.
Recently I have been helping a colleague convert a series of painfully repetitive code segments into function templates and template classes. I respect this colleague very much and he is a very skilled developer, including the use of the C++ Standard Library. However, he has never developed any templates of his own. As I was helping him learn how to develop new templates it occurred to me that there are plenty of fundamental C++ concepts that are given very little attention. This creates an enormous gap in reference material to progress from the competent skill level to proficient and expert levels.
Therefore, I am going to periodically write about fundamental concepts and how to actually apply them to your daily development. This post discusses templates at a very basic level. Entire books have been written about them. I will revisit with more sophisticated applications of templates in the future.
What is a template?
Templates are the basis for generic programming in C++. They are commonly referenced as parameterized-types and they accept parameters. Templates are extremely powerful constructs, but they require practice to benefit from their value.
Templates are also a bit tricky to work with when you first encounter them. They behave as a purely functional sub-language in C++. If you are familiar with function programming techniques, C++ templates may feel a bit more natural to you. Regardless, they open many doors to improve the robustness and quality of your code, and are well worth the time and effort required to use them effectively.
Similar to the usage of a template in the physical world, the final result of a C++ template is not compiled code. An example may be the best way to further explain how template instantiation works:
C++
template <typename T> | |
T sum(const T &lhs, const T &rhs) | |
{ | |
T result(lhs); | |
result += rhs; | |
return result; | |
} |
This example is a simple function that calculates the sum of two input values of the same type, T. This type simply acts as a placeholder for when the actual function is instantiated. With this definition alone, no code is generated. It is the pattern the compiler will use to create the target code when the template is instantiated.
Instantiation
The instantiation of a template is the creation of a template-instance for a specific type. Instantiation only requires the use of the template. In many cases the compiler can deduce the intended type for the template instantiation.
C++
int a = 10; | |
int b = 30; | |
| |
// Instantiates the function template, sum<>(). | |
int c = sum(a,b); |
For the situations where the type may be ambiguous, or you want to be certain of the type instantiated, you can explicitly declare the type during instantiation.
C++
short a = 10; | |
short b = 30; | |
| |
// Explicitly specifies the int type for the instantiation | |
// of the function template, sum<>(). | |
int c = sum<int>(a,b); |
In the previous example, the two values, a and b are of type short. They will be implicitly converted to type int to match the type of the template instantiation.
Explicit Instantiation
It is possible to force the compiler to generate an instance of a template, even when the instantiation will not be used. This is called explicit instantiation. This is useful for forward declarations and declarations for export from shared libraries. Explicit instantiations are nothing more than declarations with the specified type.
C++
// Explicitly instantiates sum for type short. | |
template short sum<short>(short, short); | |
| |
// Explicitly instantiates and deduces type long. | |
template long sum<>(long, long); | |
| |
// Explicitly instantiates and deduces type double. | |
template double sum(double, double); |
There are many uses for explicit instantiation, and the topic deserves an entire post of its own. I wanted you to be aware of the concept as well as its name. I will revisit this topic another time.
A Compiled Template
We've seen an example of a template, as well as the concept of template instantiation. What actually happens though?
It depends.
Through experience, I believe the simplest way to reason about template substitution is to treat the template type as a placeholder. Then replace each instance of the placeholder with the instantiated type. Our sum function template instantiated with type int would look like this:
C++
// template <typename int> | |
int sum(const int &lhs, const int &rhs) | |
{ | |
int result(lhs); | |
result += rhs; | |
return result; | |
} |
In fact, this is how I prefer to get a template working in the first place. I create a working version of the function or class with a specific type, then convert it to a template.
It is important to recognize the different operations that are required by the type used in the template instantiation. Specifically, in the sum example, support for the operator += is required for the function to compile properly. Most of the basic intrinsic types in C++ support this operator. Certainly the int type supports operator +=. Consider some of the classes included in the C++ Standard Library, such as std::basic_string. This class supports operator +=. Therefore, we could instantiate sum as follows:
C++
std::basic_string first = "Hello "; | |
std::basic_string second = "World"; | |
| |
std::basic_string result = sum(first, second); | |
std::cout << result ; |
The value assigned to result is "Hello World".
Unfortunately, this code would not compile if the container classes were used with the template, like list, map, or vector. They do not provide support for this operator.
Header Only
It is not a strict requirement that template definitions are located in a header file. However, it is necessary for the compiler to have access to the entire template definition when a template is to be instantiated. So, if a template definition is only required for a single module, it could be defined entirely in the source file. However, if a template shall be used across modules in your program, it will be necessary to defined the entire implementation within a header file.
Also, take some advice that will make your life simpler: Implement your entire template classes inlined within the class itself. The member function declarations become much simpler to work with, as you don't have to repeatedly define the correct template declaration of the host class.
Parameter Types
Templates are restricted to the types of template parameters that can be processed. Templates can handle:
- Types
- Non-Types
- Template Template-Parameters
Types refer to any type that can be defined, including const/volatile qualifiers.
Non-Types are things like specific values. Rather than declaring a Type-parameter, a variable can be declared instead, such as int. Non-type values are restricted to constant integral values. This means that floating-point and string literals cannot be used as template arguments. There are tricks to get around the limitations for string literals, which I will save for another time.
Here is a common example that calculates the value of factorial:
C++
template <unsigned int N> | |
struct factorial | |
{ | |
enum | |
{ | |
value = <N * factorial<N-1>:: value; | |
}; | |
}; | |
| |
template <> | |
struct factorial <0> | |
{ | |
enum { value = 1 }; | |
}; |
Notice how a struct is used to contain the value rather than a function. This is because functions are not executed at compile-time. However, the calculation specified in the declaration, value = <* factorial<N-1>:: value, will be computed by the compiler. This is due to each instantiation is required recursively until the base-case of factorial <0> is reached. There are two versions of the factorial. This is called specialization. It allows a template to handle special-cases in a different way than the general implementation. I further discuss specialization in the next section.
Template Template-Parameters are described in a later section.
Template Specialization
Template specialization allows you to define custom implementations of functions or objects for different types. This allows you to create a generic implementation as well as a custom version for types that deviate from the generic behavior. You can think of this as function overloading for template implementations.
There are two types of specialization, full and partial:
- Full-Template Specialization: This is an implementation that specifies a specific template parameter for every parameter of the original template.
- Partial-Template Specialization: This type of specialization only customizes a portion of the template. Only object-templates and member-templates may be partially specialized. Regular function templates can only be fully-specialized.
The Factorial example from the previous section demonstrated specialization. I use partial-template specialization in the Generic Example at the end of this post.
Keyword: class vs typename
One oddity that you may encounter is the usage of two different keywords in template syntax that are roughly equivalent, class and typename:
C++
template <typename T> | |
T sum(const T &lhs, const T &rhs) | |
{ | |
// ... | |
} | |
| |
// The class keyword is interchangeable with typename, in most cases. | |
template <class T> | |
T sum(const T &lhs, const T &rhs) | |
{ | |
// ... | |
} |
There are two exceptions where the syntax requires a specific keyword:
- Dependent Types: Require the
typenamekeyword to be prepended to the declaration. - Template Template Parameters: Require the
classkeyword to be used in the declaration. However,typenamecan be used as well as of C++17.
Let's introduce these two concepts so that you are aware of their existence. I will revisit these topics in detail at another time.
Dependent Types
A dependent type is a type whose definition is dependent upon another type. This could occur in both class and function definitions. There are a few cases in C++, where it becomes necessary to disambiguate the syntax of an expression, dependent types are one of those cases. Suppose we have a function that is passed a std::string and a global variable, value:
C++
int value = 0; | |
template <typename T> | |
void example(std::string<T> &str) | |
{ | |
std::string<T>::const_pointer* value; | |
} |
The previous function intended to declare of a new variable, value. However, const_pointer type has not yet been established as a type. Therefore, the compiler interprets this expression as a multiplication of the value 'const_pointer' with the int 'value' defined globally.
This declaration requires a disambiguation for the compiler, to help it identify this new item as a type. The typename keyword can accomplish this:
C++
int value = 0; | |
template <typename T> | |
void example(std::string<T> &str) | |
{ | |
// Adding 'typename' the declaration will disambiguate | |
// the expression for the compiler. | |
typename std::string<T>::const_pointer* value; | |
} |
Another alternative is to use typedef to declare a new type. This declaration also requires the use of typename
C++
int value = 0; | |
template <typename T> | |
void example(std::string<T> &str) | |
{ | |
typedef typename std::string<T>::const_pointer* ptr_t; | |
| |
// Now, 'ptr_t', has been established as a type to the compiler. | |
// The variable can be declared as: | |
ptr_t value; | |
} |
Template Template-Parameters
Template Template-Parameters is the C++ version of movie Inception. This construct allows you to build a construct that takes both a parameterized-type (template) and a type to complete it's definition. Basically, a template embedded within a template.
Here is an example of template template syntax. Notice the use of the keyword, class, in the template parameter:
C++
template< size_t index_t, | |
template<size_t> class T | |
> | |
struct accumulate_value | |
{ | |
static const size_t value = T<index_t>::value | |
+ accumulate_value<index_t-1,T>::value; | |
}; | |
| |
template<template<size_t> class T> | |
struct accumulate_value<0,T> | |
{ | |
static const size_t value = T<0>::value; | |
}; |
The previous code is a solution that I created to add the sum for each of the values held in a generic template that contained a set of template-indexed sub-objects. This is actually a meta-template programming solution. I will address that topic at a later time. Template templates are not encountered very often. However, when they are needed, this syntax becomes very useful.
A Generic Example
When working with data that must be portable across different computing platforms, the concept of byte-order or endianess, is important to understand. Some platforms like PowerPC and MIPS use big-endian byte-orders. While architectures like x86 operate on little-endian byte-orders. Big-endian places the largest byte in a word on the left.
Example:
We'll use the number: 287,454,020, which is equivalent to 0x11223344 in hexadecimal:
Broken up into bytes, we have: 0x11, 0x22, 0x33, 0x44. The highest-order byte in 0x11223344 is 0x11. This is how the values will be stored in memory for each endian-type. The orange cells indicate the high-order byte for the specified platform:
| Big-endian | | Little-Endian | |||||||||
| 287,454,020 | |||||||||||
| 11 | 22 | 33 | 44 | 11 | 22 | 33 | 44 | ||||
| 1,144,201,745 | |||||||||||
| 11 | 22 | 33 | 44 | 44 | 33 | 22 | 11 | ||||
| 287,454,020 | |||||||||||
Network Data Transfer
By convention, network communication protocols usually specify data to be transferred in network byte-order, which is big-endian byte-order. The Berkeley socket implementation (as well as most other socket library implementations) provides a set of functions to help with this conversion process, htons and htonl. These functions stand for host-to-network short and host-to-network long, respectively. Some modern implementations provide host-to-network long long, htonll, for 64-bit integers, but this function is far from standard.
If we had a data structure such as the following:
C++
struct data | |
{ | |
char d1; | |
short d2; | |
long d3; | |
long long d4; | |
unsigned char d5; | |
unsigned short d6; | |
unsigned long d7; | |
unsigned long long d8; | |
}; |
An adequate conversion function to prepare this data for transfer on the network would look like this:
C++
void data_to_network(const data& input, data& output) | |
{ | |
output.d1 = input.d1; | |
output.d2 = htons (input.d2); | |
output.d3 = htonl (input.d3); | |
output.d4 = htonll(input.d4); | |
output.d5 = input.d5; | |
output.d6 = (unsigned short) htons ((short)input.d6); | |
output.d7 = (unsigned long) htonl ((long)input.d7); | |
output.d8 = (unsigned long long) htonll((long long)input.d8); | |
}; |
Code like this is a bit fragile. There is a different function name used to convert each data type. Remember, these are C-library calls. Also, the single-byte values that do not require byte-order conversion, but if the type for these fields is increased in size this code would need to be revisited to add the appropriate conversion function.
We could use function overloading in C++. Simply create a set of functions with the same name for all of the different types, including the single-byte types. That's only 8 functions to implement... Oh, wait! We forgot about the int variants. Also, how to deal with floating-point types?
This is a perfect fit for a parameterized solution (templates). The only problem is some of the types requires a different conversion implementations. I previously mentioned template specialization. This is the technique we need to employ to solve this problem.
Solution
Let's first start with the base implementation for this template. That would be the conversion function that simply passes the data through to the return value.
C++
template <typename T> | |
T to_network_byte_order(T value) | |
{ | |
return value; | |
} |
Simple.
Now let's create the conversion function for a short, which is two-bytes in length. We start with a specialized definition for this template:
C++
template <> | |
short to_network_byte_order<short>(short value) | |
{ | |
return htons(value); | |
} |
The only problem is this looks an awfully lot like the implementation if we were to use the overloaded function solution. There are two problems, 1) types are explicitly specified and we wanted to avoid that, 2) we need to address the signed vs. unsigned type specifiers.
So solve this, we can differentiate on the template implementation based on the size of the data type. That is essentially what we did in the first place when we used the htons function to convert the unsigned short. This will require a slight modification to the base template.
C++
template <typename T, size_t SizeT> | |
T to_network_byte_order(T value) | |
{ | |
return value; | |
} |
We also want to have something like this for our new version of the short conversion function:
C++
// This will not compile, why? | |
template <typename T> | |
T to_network_byte_order<T, 2>(T value) | |
{ | |
return htons(value); | |
} |
The problem is, this is called partial specialization and it is not permitted for functions. However, it is allowed for class and struct. So we can still achieve our goal with one more adjustment to our strategy. We will now encapsulate our byte-order conversion logic within a member function of a partially-specialized struct. Then use a top-level template function to construct and call this conversion struct. Here is the definition of the templated structs.
C++
template <typename T, size_t SizeT> | |
struct Convert | |
{ | |
static T swap(T value) { return value; } | |
}; | |
| |
template <typename T> | |
struct Convert<T, 2> | |
{ | |
static T swap(T value) { return htons(value); } | |
}; | |
| |
template <typename T> | |
struct Convert<T, 4> | |
{ | |
static T swap(T value) { return htonl(value); } | |
}; | |
| |
template <typename T> | |
struct Convert<T, 8> | |
{ | |
static T swap(T value) { return htonll(value); } | |
}; |
Now finally, the top-level function that will access the byte-order conversion logic:
C++
template <typename T, size_t SizeT> | |
T to_network_byte_order(T value) | |
{ | |
return Convert<T, sizeof(T)>::swap(value); | |
} |
What does this solution look like when it is used in our original conversion function:
C++
void data_to_network(const data& input, data& output) | |
{ | |
output.d1 = to_network_byte_order(input.d1); | |
output.d2 = to_network_byte_order(input.d2); | |
output.d3 = to_network_byte_order(input.d3); | |
output.d4 = to_network_byte_order(input.d4); | |
output.d5 = to_network_byte_order(input.d5); | |
output.d6 = to_network_byte_order(input.d6); | |
output.d7 = to_network_byte_order(input.d7); | |
output.d8 = to_network_byte_order(input.d8); | |
}; |
Now, if the data-types are changed during the life of this program, this parameterized implementation will automatically re-compile and adjust to the proper implementation because of this generic implementation.
If only C++ supported reflection, then a function could be written to simply apply the function call, to_network_byte_order to each member of a class or struct. Many efforts are currently under-way to add reflection to C++. I don't know when or if that will happen. Until then, this is the type of problem that my library Alchemy[^] solves.
Summary
Templates are a very powerful tool that is overlooked by many C++ developers. Learning to use the C++ Standard Library is a good start towards increasing your productivity and the reliability of your software. Learning to develop your own robust templates to solve problems for a variety of types will take you to the next level. However, the foreign syntax, functional behavior, and somewhat obscure rules tend to trip up beginners to this aspect of C++ development. This introduction should provide you with the knowledge required to tackle these hurdles. Continue to practice with them and improve your skills. If you have any questions, feel free to post a comment or send me an email.
Copyright Infringement
Let's start with my personal experience with copyright infringement.
Before I created my own site, I posted many articles at codeproject.com. I like to write on topics that I am interested in to learn them better. Around 2002 I wrote a basic implementation of the game Tetris to learn DirectX and similar technologies. I posted this on CodeProject.com.
The Tetris Company is a very litigious entity, and ownership of game itself is has been surrounded in controversy throughout its existence. In 2007 I received a letter from CodeProject informing me that they had to remove my article from their site because they received a DMCA copyright notice from The Tetris Company.
Then about nine months later, CodeProject sent me another letter indicating that if I were to remove all references to "Tetris" from my article and code, they could repost it on the site. They also included a few legal references for me to help educate myself on copyright law, which I will share in a moment.
After a bit of research I settled on a new name for my game, Quadrino. I removed references to the name "Tetris" and cleaned up my article. CodeProject then reposted it to their site, and I haven't been harrassed by The Tetris Company since then.
If you are interested, you can checkout Quadrino[^] at CodeProject. This version uses DirectX 7 and 8, but it still works. I have a port that I updated to use Direct 2D and added support for Xbox 360 controllers, however, I never polished it up enough to release it.
What Does a Copyright Protect?
(Disclaimer: The following is my understanding and experiences with copyright law. I'm not lawyer and the courts and legal system do not always seem to play out logically to me. Also, it seems to me that what you can prove in a court of law tends to be more valuable than the truth.)
It turns out that a copyright only protects the original expression of an idea, but not the idea itself (which really does lead to a lot of confusion and misinterpretations).
For example:
- Books
- Poems
- Lyrics to a song (written or otherwise)
- Written sheet music for a melody
- A recorded version of the singer singing or a musician playing
- Paintings
- Sculptures
Other examples of creations that are protected:
- Software Source Code as well as compiled binaries
- Hardware design documents
- Research Papers
- Blog entries
- Internet forum comments
- Contracts
- Technical Manuals
- Parker Brothers's written rules to Monopoly
The name of the game Monopoly is trademarked (a different form of protection, which is also different from a "registered trademark"). The written rules to Monopoly have copyright protection, however, the concept of the game of Monopoly itself cannot be protected in any way. That is why you will see games similar to Monopoly from time to time. Such as a local city themed version of the game with local landmarks, events, celebrities. As long as they write their own version of the rules and avoid the name Monopoly, they can legally sell their game.
This is the aspect of copyrights that allowed me to change the name of my game and avoid any further infringement violations.
Then issues start to arise such as the "look and feel" of a product and so on.
And yes, works published on the Internet are publically accessible, however, they are not considered in the public domain, which means you still hold the copyright to whatever you post. Terms of service for a website may state that by posting content on their site that you give them ownership, a limited use copyright license, or many other things (damn fine print.)
How do you Copyright something?
Step 1: You create it
Congratulations! You have just completed the copyright process to the expression of your idea!
That's it!
There is only one step. You do not need to put a copyright symbol on the creative work, no date is required, and the "poor man's" copyright is a myth. That is, sending yourself a sealed copy of your work in the mail doesn't gain you anything (you'll actually be out the cost of the envelope and price of shipping, not to mention the "opportunity cost" of what you could have done with your time instead of mailing something to yourself).
Adding the symbols, date, signing with your name etc. helps establish ownership and disambiguate that you are claiming your copy rights. Otherwise, if you can prove that you are the creator of a work, then you automatically own the copyright of that work (and it's what you can prove in a court of law that actually matters.)
This is for works created after 1989, because copyright notices were required before this point. For more details on this, look up the Berne Convention Implementation Act, which makes copyright ownership automatic. If you created your work before 1989 and forgot to properly mark your creative work, you may still be able to claim it. You should consult a lawyer if it matters that much.
Fair Use
I am not going to go into full detail on this, but there is a concept of fair use on copyrights. For the purpose of reviews, references and citations you can use a portion of a creation that is under copy protection. You can also use this content for satire and parodies and to create derivative works.
Supreme Court decisions
- 1994 Campbell v. Acuff-Rose Music, Inc. [Copyright - Fair Use - Parody]
- 1984Sony Corp. of Am. v. Universal City Studios, Inc. [Copyright - Fair Use - Sale and Use of VCRs]
Derivative Works
Derivative works are a sticky issue. These works can be derivations of an existing work, but they must be more your work than the original. Beyond that basic notion, my understanding is limited. This is a very gray area. Hell, Google avoided a $9.2B lawsuit against Oracle that has been raging in our courts since 2011, because the jury ruled Google had Fair Use rights to create a derivative work. Many analysts are expecting Oracle to appeal. We'll have to wait and see what happens.
Digital Millennium Copyright Act(DMCA)
The Digital Millennium Copyright Act (DMCA) is a four-letter word for security researchers and hobbyists, especially section 1201. It was enacted in 1998 and was aimed at protecting the actors, authors, artists and musicians (more accurately studios, publishers, and recording companies) creative works (distributed content) from being illegally pirated on the Internet and other forms of digital media that began to evolve.
One of the clauses and subsequent side-effects of this law (in the United States) prohibits a lawful owner from reverse engineering anti-circumvention provisions in most cases. This has brought John Deere and auto manufacturer's into the spot light recently as they are trying to use this law to prevent security researchers from looking for vulnerabilities in their equipment and maintain a monopoly on the support and repair of these complex systems.
It's some of the side-effects of the DCMA that make me a little jumpy at the threat of being sued. The penalties could reach a fine of $5M and 5 years in prison. For this reason, the Electronic Frontier Foundation (EFF) is suing the federal government on behalf of Andrew Huang, and Matthew Green. You can read the press release made by the EFF here: EFF Lawsuit Takes on DMCA Section 1201: Research and Technology Restrictions Violate the First Amendment[^].
Wait! What are those sub-clauses in section 1201?
There are a number of sub-clauses in section 1201 that actually give owners of lawfully acquired (i.e., not pirated or stolen) copy written material, to reverse-engineer and circumvent the copyright protection mechanism in a few select instances:
- f. Reverse Engineering for achieving interoperability
- g. Encryption Research
- i. Protection of Personally Identifying Information
- j. Security Testing (Research)
I mentioned this to Matt Green through Twitter, and his response was:
Matt wrote a blog entry that details why he is doing this. You can read that here: Matthew Green's Statement on DMCA lawsuit[^]
After I read his blog post I asked myself this question:
Even with the law on my side, do I really want to risk getting taken to court by a mega-corporation with deep pockets?
My conclusion:
Nope!
Summary
Copyright and patent infringement are civil offenses and are likely only to become a concern for hackers if the goal is to duplicate and manufacture their own product for profit. Regardless of their moral view on if they are entitled to hack systems, violation of one of these IP legal protections is likely to only affect a hacker if their activities will end in a lawsuit and probable loss in an infringement case with the original manufacturer.
Otherwise, the criminal penalties for hacking are much more severe with penalties that could include both jail time and monetary fines. When the topic moves into espionage, a death sentence is even a potential outcome. Therefore, I doubt that any hackers (with the exception of corporate reverse-engineers) even consider the legal violations of IP protection that they are committing.
A software library provides no value if it does not simplify the task of creating your application. At the very least we would like to show that the library contains all of the tools required to complete the intended goal. Ideally, the library is complete, easy to use, and is efficient. The only way to learn how well the library is designed and implemented is to use it.
Furthermore, it is useful and sometimes necessary to provide an exemplar for others to see how the library is intended to be used. The Steganography sample program included with Alchemy is this exemplar. I chose steganography to demonstrate that Alchemy is much more useful than the serialization of data for networking. In the process of developing this application I discovered some pain-points with the library and added tools to Alchemy to eliminate this pain.
Steganography
What is steganography?
Steganography is the hiding of messages within plain-sight. This should not be confused with "Stenography," which is the recording of dictation. Steganography can be performed in may ways. Normal words can be given special meaning and included within a message that appears to be mundane. The location of words relative to others in the message can have a significant meaning. The second letter of every other word can be extracted to form the message. The possibilities are endless.
The form of steganography that I have implemented with Alchemy embeds a text message within a bitmap image. This can be achieved by taking advantage of the fact that the low-order bits for the color channels in an image affect the final color much less compared to the high-order bits.
The table below shows a sample for each color channel, with and without the two lower-bits set. The row with binary indicates the values of the four lower-bits for each 8-bit color. For demonstration purposes, the alpha channel is represented with grayscale.
| Red | Green | Blue | Alpha | |||||||
| FF | FC | FF | FC | FF | FC | FF | FC | |||
1111 |
1100 |
1111 |
1100 |
1111 |
1100 |
1111 |
1100 |
|||
Compare this to the result if we substitute only the single high-bit for each color channel:
| Red | Green | Blue | Alpha | |||||||
| 7F | FF | 7F | FF | 7F | FF | 7F | FF | |||
0111 |
1111 |
0111 |
1111 |
0111 |
1111 |
0111 |
1111 |
|||
The only caveat is the image should have a sufficient amount of entropy, otherwise the noise added by the encoded data may become visible; if not to a human, then most certainly to computer searching for such anomalies. Photographs with a range of gradients are good candidates for this form of steganography.
Why Use Steganography as a Sample?
Through the development of the base set of features for Alchemy, I focused solely on the serializing of data for network data transfer protocols. However, Alchemy is a flexible serialization library that is not restricted to network communication. Portable file formats also require serialization capabilities similar to the capabilities found in Alchemy. To this end, loading and storing a bitmap from a file is a good serialization task; bitmaps are relatively easy to acquire, and the format is simple enough to be implemented in a small sample program.
I wanted to keep the program simple. Writing a portable network communication program is not simple; especially since Alchemy does not provide functionality directly related to network communication. I also felt that if I were to use a network related exemplar, potential user of Alchemy would assume it can only be used for network related tasks. Moreover, I did not want to add extra support code to the application that would hide or confuse the usage of Alchemy.
Strategy
In keeping with simplicity, the sample program requires 32-bit bitmaps. For this type of encoding, there are four color channels (Red, Green, Blue, and Alpha) for each pixel, where each channel is one-byte in size. We will encode a one-byte of data within each pixel. To accomplish this, we will assign two-bits of the encoded byte into the two lower-bits of each color channel. This results in a 25% encoding rate within the image.
Consider an example where we combine the orange color 0xFF9915 with the letter i, 0x69:
| Channel 1 | Channel 2 | Channel 3 | Channel 4 | |||||||||
| Input | 0xFF | 0x99 | 0x15 | 0x00 | ||||||||
| Value | 1111 |
1111 |
1001 |
1001 |
0001 |
0101 |
0000 |
0000 |
||||
| Data | 01 |
10 |
10 |
01 |
||||||||
| Result | 1111 |
1101 |
1001 |
1010 |
0001 |
0110 |
0000 |
0001 |
||||
| Output | 0xFD | 0x9A | 0x16 | 0x01 | ||||||||
This is not a very complex encoding strategy. However, it will allow me to demonstrate the serialization of data for both input and output, as well as the packed-data bit (bit-field) functionality provided by Alchemy.
Bitmap Format
The bitmap file format has many different definitions. The variety of formats are a result of its inception on IBM's OS/2 platform, migration to Windows, and evolution through the years. Additionally, the format allows for an index 8-bit color table, Run-Length Encoded (RLE) compression, gamma correction, color profiles and many other features.
The sample application simply uses the bitmap format introduced with Windows 3.0. It contains a file header that indicates the file is of type BITMAP, a bitmap information section, and the pixel data. The Alchemy definitions for each section are found below. These definitions provide the fundamental structure for the data; the goal was to provide a table-based definition that looks very similar to the definition of a struct. This declaration is also for generating the majority of the serialization logic for Alchemy:
File Header
The bitmap file header is a short constructor that is only 14-bytes large. The first two bytes will contain the letters "BM" to indicate that this is a bitmap. The length of the file, and the offset to the first pixel data are also encoded in this structure:
C++
// ************************************************************* | |
ALCHEMY_STRUCT(bitmap_file_header_t, | |
ALCHEMY_DATUM(uint16_t, type), | |
ALCHEMY_DATUM(uint32_t, length), | |
ALCHEMY_DATUM(uint16_t, reserved_1), | |
ALCHEMY_DATUM(uint16_t, reserved_2), | |
ALCHEMY_DATUM(uint32_t, offset) | |
) |
Bitmap Information Header
The bitmap information section is 40-bytes of data that defines the dimensions and color-depth of the encoded bitmap:
C++
// ************************************************************* | |
ALCHEMY_STRUCT(bitmap_info_header_t, | |
ALCHEMY_DATUM(uint32_t, size), | |
ALCHEMY_DATUM(int32_t, width), | |
ALCHEMY_DATUM(int32_t, height), | |
ALCHEMY_DATUM(uint16_t, planes), | |
ALCHEMY_DATUM(uint16_t, bit_depth), | |
ALCHEMY_DATUM(uint32_t, compression), | |
ALCHEMY_DATUM(uint32_t, sizeImage), | |
ALCHEMY_DATUM(int32_t, x_pixels_per_meter), | |
ALCHEMY_DATUM(int32_t, y_pixels_per_meter), | |
ALCHEMY_DATUM(uint32_t, color_count), | |
ALCHEMY_DATUM(uint32_t, important_color) | |
) |
Bitmap Information
This is a utility definition to combine the information header and the color data from the buffer for convenience:
C++
// ************************************************************* | |
ALCHEMY_STRUCT(bitmap_info_t, | |
ALCHEMY_DATUM(bitmap_info_header_t, header), | |
ALCHEMY_ALLOC(byte_t, header.sizeImage, pixels) | |
) |
Pixel Definition
This is a convenience structure to access each color-channel independently in a pixel:
C++
// ************************************************************* | |
ALCHEMY_STRUCT(rgba_t, | |
ALCHEMY_DATUM(byte_t, blue), | |
ALCHEMY_DATUM(byte_t, green), | |
ALCHEMY_DATUM(byte_t, red), | |
ALCHEMY_DATUM(byte_t, alpha) | |
) |
Alchemy Declarations
Storage Buffer
Alchemy supports both static and dynamic memory management for its internal buffers; dynamic allocation is the default. However, the storage policy can easily be changed to a static policy with a new typedef. The definition below shows the static buffer definitions used by the sample program:
C++
namespace detail | |
{ | |
typedef Hg::basic_msg<Hg::bitmap_file_header_t, | |
Hg::BufferedStaticStoragePolicy> hg_file_t; | |
| |
typedef Hg::basic_msg<Hg::bitmap_info_t, | |
Hg::BufferedStaticStoragePolicy> hg_info_t; | |
} |
Alchemy Message
For convenience, we also pre-define a type for the message format type.
C++
typedef Hg::Message< detail::hg_file_t> file_t; | |
typedef Hg::Message< detail::hg_info_t> info_t; |
Bitmap Abstraction
As I mentioned previously, I wanted to keep this sample application as simple as possible. One of the things that I was able to do is encapsulate the bitmap data details into the following Bitmap abstraction. This class provides storage for a loaded bitmap, loads and stores the contents, and provides a generic processing function on each pixel:
C++
class Bitmap | |
{ | |
public: | |
bool Load (const std::string &name); | |
bool Store(const std::string &name); | |
| |
void process( std::string &msg, | |
pixel_ftor ftor); | |
private: | |
std::string m_file_name; | |
| |
file_t m_file_header; | |
info_t m_info; | |
}; |
The processing function takes a function-pointer as an argument that specifies the processing operation to be performed each time the function is called. This is the definition for that function-pointer.
C++
typedef void (*pixel_ftor) ( Hg::rgba_t& pixel, | |
Hg::byte_t& data); |
Load and Store
This section shows the implementation for both the Load and Store operations of the bitmap. The implementation uses the Standard C++ Library to open a file, and read or write the contents directly into the Hg::Message type with the stream operators.
C++
// ************************************************************* | |
bool Bitmap::Load (const std::string &name) | |
{ | |
m_file_name = name; | |
| |
std::ifstream input(m_file_name, std::ios::binary); | |
if (input.bad()) | |
{ | |
return false; | |
} | |
| |
input >> m_file_header; | |
| |
const size_t k_info_len = 0x36ul; | |
if (k_info_len != m_file_header.offset) | |
{ | |
return false; | |
} | |
| |
input >> m_info; | |
| |
return true; | |
} |
And the implementation for Store:
C++
// ************************************************************ | |
bool Bitmap::Store (const std::string &name) | |
{ | |
std::ofstream output(name, std::ios::binary); | |
if (output.bad()) | |
{ | |
return false; | |
} | |
| |
output << m_file_header; | |
output << m_info; | |
| |
return true; | |
} |
Process
I mentioned at the beginning that it is important to implement programs that perform real-work with your libraries to verify that your library is easy to use and provides the desired functionality as expected. With my first pass implementation of this program, both of those qualities were true for Alchemy, except the performance was quite slow. The cause turned out to be the load and initialization of every single pixel into my implementation for Hg::packed_bits.
The problem is that the bytes that represent the pixel data are normally read into an array as a bulk operation. Afterwards, the proper address for each pixel is indexed, rather than reading the data into an independent object that represents the pixel. When I recognized this, I came up with the idea for the data_view<T> construct. This allows a large buffer to be loaded as raw memory, and a view of the data can be mapped to any type desired, even a complex data structure such as the rgba_t type that I defined.
The data_view is an object that provides non-owning access to the underlying raw buffer. If this sounds familiar that is because it is very similar to the string_view construct that is slated for C++17. It was shortly after I implemented data_view that discovered that string_view existed. So I was a bit shocked, and delighted when I realized how similar the concepts and implementations are to each other. It was a bit of validation that I had chosen a good path to solve this problem.
I plan to write an entry that describes the data_view in detail at a later time. Until then, if you would like to learn more about the approach, I encourage you to check out its implementation in Alchemy, or the documentation for the string_view object.
The purpose of process is to sequentially execute the supplied operation on a single message byte and source image pixel. This is continued until the entire message has been processed, or there are no more available pixels.
C++
// ************************************************************* | |
void Bitmap::process( std::string &msg, | |
pixel_ftor ftor) | |
{ | |
auto t = Hg::make_view<Hg::rgba_t>(m_info.pixels.get()); | |
auto iter = t.begin(); | |
| |
// Calculate the number of bytes that can be encoded or extracted | |
// from the image and ensure the the message buffer is large enough. | |
size_t length = t.end() - iter; | |
msg.resize(length); | |
| |
for (size_t index = 0; iter != t.end(); ++iter, ++index) | |
{ | |
ftor(*iter, (Hg::byte_t&)(msg[index])); | |
} | |
} |
Weave and Extract
These are the two functions that provide the pixel-level operations to encode a message byte into a pixel with the strategy that was previously mentioned. Weave combines the message byte with the supplied pixel, and Extract reconstructs the message byte from the pixel.
I am investigating the possibility of implementing a union-type for Alchemy. If I end up doing this I will most likely revisit this sample and provide an alternative implementation that incorporates the Hg::packed_bits type. This will completely eliminate the manual bit-twiddling logic that is present in both of these functions:
C++
// ************************************************************* | |
void weave_data ( Hg::rgba_t& pixel, | |
Hg::byte_t& data) | |
{ | |
using Hg::s_data; | |
| |
s_data value(data); | |
| |
pixel.blue = (pixel.blue & ~k_data_mask) | |
| (value.d0 & k_data_mask); | |
pixel.green = (pixel.green & ~k_data_mask) | |
| (value.d1 & k_data_mask); | |
pixel.red = (pixel.red & ~k_data_mask) | |
| (value.d2 & k_data_mask); | |
pixel.alpha = (pixel.alpha & ~k_data_mask) | |
| (value.d3 & k_data_mask); | |
} |
Extract implementation:
C++
// ************************************************************* | |
void extract_data ( Hg::rgba_t& pixel, | |
Hg::byte_t& data) | |
{ | |
using Hg::s_data; | |
| |
s_data value; | |
| |
value.d0 = (pixel.blue & k_data_mask); | |
value.d1 = (pixel.green & k_data_mask); | |
value.d2 = (pixel.red & k_data_mask); | |
value.d3 = (pixel.alpha & k_data_mask); | |
| |
data = value; | |
} |
The Main Program
The main program body is straight-forward. Input parameters are parsed to determine if an encode or decode operation should be performed, as well as the names of the files to use.
C++
// ************************************************************* | |
int main(int argc, char* argv[]) | |
{ | |
if (!ParseCmdParams(argc, argv)) { | |
PrintHelp(); | |
return 0; | |
} | |
| |
string message; | |
sgraph::Bitmap bmp; | |
bmp.Load(input_file); | |
if (is_encode) { | |
message = ReadFile(msg_file); | |
bmp.process(message, weave_data); | |
bmp.Store(output_file); | |
} | |
else { | |
bmp.process(message, extract_data); | |
WriteFile(output_file, message); | |
} | |
| |
return 0; | |
} |
Results
To demonstrate the behavior of this application I ran sgraph to encode the readme.txt file from its project. Here is the first portion of the file:
========================================================================
    CONSOLE APPLICATION : sgraphy Project Overview
========================================================================

AppWizard has created this sgraphy application for you.

This file contains a summary of what you will find in each of the files that
make up your sgraphy application.
Into this image:

This is the result image:

For comparison, here is a sample screen-capture from a Beyond Compare diff of the two files:
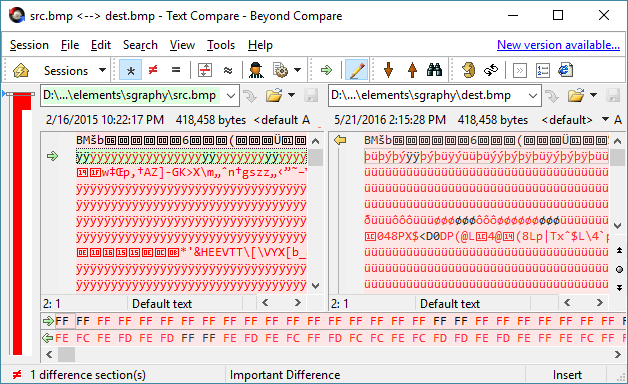
Summary
I implemented a basic application that performs steganography to demonstrate how to use the serialization features of my library, Alchemy. I chose a unique application like this to make the demonstration application a bit more interesting and to show the library can be used for much more than just serialization of data for network transfer.
Twitter is an... interesting way to spend one's time. It can be quite a challenge to cram a thought into 140 characters. However, I have found there are many ways to be entertained by this micro-blogging site. One of them includes interacting and learning from a wide variety of people. During an interaction with a creative-writer, I was a bit challenged by a poem.

This is a brief entry that includes my implementation of that "Poem Anagram Generator."
The Original Poem
The first thing that is required, is the poem. You can find the original at what_adri_writes[^].
Here is an excerpt:
Stanley the fishmonger
told me how to know it
when I saw it
without a poet
And we fished out drowned Phlebas,
Patron saint of Unconsidered Phoenicians
and failed Changers of Minds.
The Highlander Art double-checked the veil
of Reichenbach Falls
three days later
and found
A beekeeper.
Strategy
When I thought about it, I realized it wouldn't take much to actually write a program to reorganize the words of the poem. Especially if I were to use the algorithms that are available in the C++ Standard Library. That is, of course, creating the naïve implementation that ignores such possibly desirable features such as sentence structure or proper grammar.
Then again, this is poetry!
So let's go ahead and throw those concerns out the window. This will be a post-modern avant-garde cyber-experience.
Tokenize
My original goal was to tokenize all of the words from the poem, then randomize with something like next_permutation. However, when I really started to look at the text I saw all of the punctuation. Did I want to remove the punctuation and just live with the words? Well then there are also the new-lines that give the text form and clues the reader in that "pssst, this is probably a poem"
So I decided that I would include both the punctuation and new-lines as tokens to be generated for the poem generator.
To do this I put a space between ever word, punctuation mark, and new-line in the poem; like so:
C++
const std::string poem( "Oh but I too want to be a poet ! \n " | |
"and yet \n " | |
"Tell me where is meaning bred \n " | |
"In my heart or in your head ? \n " | |
| |
// omitted for brevity | |
| |
"And so the poem \n " | |
"was not to be . \n"); |
Here is a simple function to add each token into a vector for future modification:
C++
typedef vector<string> words_t; | |
| |
// ************************************************************ | |
words_t tokenize(const string &poem) | |
{ | |
words_t words; | |
size_t next = 0; | |
| |
do | |
{ | |
size_t cur = next; | |
next = poem.find(' ', cur); | |
| |
size_t count = next == string::npos | |
? string::npos | |
: next - cur; | |
words.push_back(poem.substr(cur, count)); | |
| |
if (next != string::npos) | |
next += 1; | |
| |
} while (next != string::npos); | |
| |
return words; | |
} |
If I missed a potential algorithm from the standard library that would perform this task I would be interested to learn how this function could be simplified.
The Generator
The generator code is found below. It contains three algorithms from the standard library; A random number generator, shuffle and copy. Then of course the call to tokenize.
You can run the code below to generate a new poem each time.
C++
// ************************************************************ | |
int main() | |
{ | |
// Tokenize the poem. | |
words_t words(tokenize(poem)); | |
| |
// Jumble the words. | |
random_device rdev; | |
mt19937 rng(rdev()); | |
| |
shuffle(words.begin(), words.end(), rng); | |
| |
// Print the results. | |
copy(words.begin(), words.end(), ostream_iterator<string>(cout, " ")); | |
| |
cout << "\n"; | |
| |
return 0; | |
} |
Output:
Twitter and Poetry...
Instant art!
Maybe to improve upon this I could pre-tokenize based on particular phrases.
Summary
Twitter is fun!
C++ is fun!
Combining Twitter and C++ makes poetry fun even for a left-brained analytic like myself.
If you end up generating an interesting poem, post it in the comments.
The "Little Planet" effect is the colloquial name often used to refer to the mathematical concept of a stereographic projection. The end result is quite impressive, especially considering the little amount of code that is actually required to create the image. All that is required is a panoramic image with a 360° view from side to side, or a photo-sphere, such as used with Google Earth to provide an immersive view of a location.

Stereographic Projection
This is a mapping from a spherical position onto a plane. You will commonly see this type of projection in cartography; two examples are mapping the earth and planispheres (celestial charts). This projection is useful because it is not possible to map from a sphere to a plane without some type of distortion. The stereographic projection preserves angles and distorts areas. This trade-off is preferred for navigation, which is typically performed with angles.
The projection is typically performed from one of the poles. However, it can originate from any point on the sphere. For simplicity, unless otherwise stated I will refer to projections that originate at the North Pole of the sphere. For a unit-sphere located at the origin, this would be at \(\matrix{[0 & 0 & 1]}\)
The distortion of the image depends on the placement of the plane relative to the sphere. The upper hemisphere exhibits most of the distortion. The distortion becomes more extreme the closer the point in the sphere's surface approaches the origin of the projection. The projection extends to infinity as the projection's origin is undefined.
If the plane bisects the sphere at the equator, the lower hemisphere will be projected within an area the size of the circumference of the sphere, and the upper hemisphere is projection on the plane outside of the sphere.
When the plane is located at the surface of the sphere, opposite from the projection's origin, the lower hemisphere will project over an area that is twice that of the sphere's equator. The image below illustrates this configuration.
We can reference any point on the spheres surface with two angles representing the latitude \(\phi\) and longitude \(\lambda\), where:
\(-\pi \lt \lambda \lt \pi, -\cfrac{\pi}{2} \lt \phi \lt \cfrac{\pi}{2} \)
The following image is a scaled down version of the panorama that I used to generate the stereographic projection of the Golden Gate Bridge at the beginning of the article. Normally we would index the pixels in this image with two variables, \(x\) (width) and \(y\) (height).

We can simplify the math to map a full-view panorama to a sphere by normalizing the dimensions for both the sphere and our surface map; that is, to reduce the scale to the unit scale of one. This means we will perform the surface map operation on a unit-sphere, and the dimensions of our panorama will then span from: \(-1 \lt x \lt 1, -1 \lt y \lt 1\).
The following image shows how the coordinate system from the sphere maps to the image:
Project the sphere onto the Plane
We will create a ray, to calculate the projection of a single point from the sphere to the plane. This ray begins at the projective origin, passes through the sphere and points at any other point on the surface of the sphere. This ray continues and will intersect with the projective plane. This intersection is the point of projection. Alternatively, we can calculate the intersection point on the sphere's surface, given a ray that points between the projective origin and the projection plane. This demonstrates that the stereographic projection is a bijective operation; there is a one-to-one correspondence for the values on both surfaces.
The diagram below depicts the projection in two-dimensions:
If \(\lambda_0\) as the central longitude and (\phi_1\) as the central latitude, this relationship can be stated mathematically as:
\( \eqalign{ u &= k \cos \phi \sin(\lambda - \lambda_0) \cr v &= k [ \cos \phi_1 \sin \phi - \sin \phi_1 \cos \phi \cos(\lambda - \lambda_0)]\cr & where \cr k &= \cfrac{2R}{1+ \sin \phi_1 \sin \phi + \cos \phi_1 \cos \phi \cos(\lambda - \lambda_0)} } \)
The term \(k\) determines where the projected plane is located.
Codez Plz
That is enough theory and explanation. Here is the code that I used to generate the stereographic projections of the Golden Gate Bridge and Las Vegas. The code presented below is adapted from a project I just completed that used the Computer Vision library OpenCV. The only important thing to note in the code below is that Mat objects are used to store images and pixels are represented with a type of std::vector. You should have no problem converting the pixel access operations from the code below to whatever image processing API that you are using.
If you do run into problems, leave a comment and I will help you work through porting the code.
First, here are two constants defined in the code:
C++
const double k_pi = 3.1415926535897932384626433832795; | |
const double k_pi_inverse = 0.31830988618379067153776752674503; |
There are three functions:
Main Projection
This function works by creating a ray between the projection origin and a pixel location on the projection plane. The intersection of the sphere's surface is calculated, which indicates the location to sample from the sphere's surface map. Because we are dealing with discrete, pixelated digital images, this sampling process creates visual artifacts. To help improve the smoothness of the image, we use a bilinear filter to average the values of four surrounding pixels of the sample location from the sphere.
C++
void RenderProjection(Mat &pano, long len, Mat &output) { | |
output.create(len, len, CV_16UC3) | |
long half_len = len / 2; | |
Size sz = pano.size(); | |
| |
for (long indexX = 0; indexX < len; ++indexX) { | |
for (long indexY = 0; indexY < len; ++indexY) { | |
double sphereX = (indexX - half_len) * 10.0 / len; | |
double sphereY = (indexY - half_len) * 10.0 / len; | |
double Qx, Qy, Qz; | |
| |
if (GetIntersection(sphereX, sphereY, Qx, Qy, Qz)) | |
{ | |
double theta = std::acos(Qz); | |
double phi = std::atan2(Qy, Qx) + k_pi; | |
theta = theta * k_pi_inverse; | |
phi = phi * (0.5 * k_pi_inverse); | |
double Sx = min(sz.width -2.0, sz.width * phi); | |
double Sy = min(sz.height-2.0, sz.height * theta); | |
| |
output.at<Vec3s>(indexY, indexX) = BilinearSample(pano, Sx, Sy); | |
} | |
} | |
} | |
} |
Calculate the Intersection
This calculation is an optimized reduction of the quadratic equation to calculate the intersection point on the surface of the sphere.
C++
bool GetIntersection(double u, double v, | |
double &x, double &y, double &z) | |
{ | |
double Nx = 0.0; | |
double Ny = 0.0; | |
double Nz = 1.0; | |
double dir_x = u - Nx; | |
double dir_y = v - Ny; | |
double dir_z = -1.0 - Nz; | |
| |
double a = (dir_x * dir_x) + (dir_y * dir_y) + (dir_z * dir_z); | |
double b = (dir_x * Nx) + (dir_y * Ny) + (dir_z * Nz); | |
| |
b *= 2; | |
double d = b*b; | |
double q = -0.5 * (b - std::sqrt(d)); | |
| |
double t = q / a; | |
| |
x = (dir_x * t) + Nx; | |
y = (dir_y * t) + Ny; | |
z = (dir_z * t) + Nz; | |
| |
return true; | |
} |
Bilinear Filter
The bilinear filter calculates a weighted-sum of the four surrounding pixels for a digital image sample.
C++
Vec3s BilinearSample(Mat &image, double x, double y) { | |
Vec3s c00 = image.at<vec3s>(int(y), int(x)); | |
Vec3s c01 = image.at<vec3s>(int(y), int(x)+1); | |
Vec3s c10 = image.at<vec3s>(int(y)+1, int(x)); | |
Vec3s c11 = image.at<vec3s>(int(y)+1, int(x)+1); | |
| |
double X0 = x - floor(x); | |
double X1 = 1.0 - X0; | |
double Y0 = y - floor(y); | |
double Y1 = 1.0 - Y0; | |
| |
double w00 = X0 * Y0; | |
double w01 = X1 * Y0; | |
double w10 = X0 * Y1; | |
double w11 = X1 * Y1; | |
| |
short r = short(c00[2] * w00 + c01[2] * w01 | |
+ c10[2] * w10 + c11[2] * w11); | |
short g = short(c00[1] * w00 + c01[1] * w01 | |
+ c10[1] * w10 + c11[1] * w11); | |
short b = short(c00[0] * w00 + c01[0] * w01 | |
+ c10[0] * w10 + c11[0] * w11); | |
| |
return make_BGR(b, g, r); | |
} |
...and a helper function:
C++
Vec3s make_BGR(short blue, short green, short red) | |
{ | |
Vec3s result; | |
result[0] = blue; | |
result[1] = green; | |
result[2] = red; | |
| |
return result; | |
} |
Here is another sample of a stereographic projection and the panorama that I used to create it:

Summary
The stereographic projection has been known and used since the time of the ancient Greeks. It was heavily used in the Age of Exploration to create maps of the world where the distortion was applied to distances, and the relative angles between local points is preserved. When it is applied to full-view panoramas a neat effect is created called, "The Little Planet Effect." With just a little bit of theory and some concepts from computer graphics we were able to turn this concept into code with less than 100 lines of code.
I wanted to start writing about secure coding practices as well as more instructive posts related to security topics such as encryption and hacking. You probably already have a conceptual understanding of things like the "stack", "heap" and "program counter". However, it's difficult to have concrete discussions regarding security unless you have a solid grasp on the computer memory model. This post is intended to provide a concrete foundation of the memory model, and my future posts related to security will build on this foundation.
It is easy to take for granted the complexity of computer memory because of the many layers of abstraction that programmers work through today. The same basic memory design has existed for all computers that use a paged memory structure since the early 60's. These are some of the areas where the knowledge of the memory layout plays a crucial role in application portability and embedded resources, program security, code optimization. The diagrams I present will also help you understand where the different activities occur in a program during runtime.
Memory (RAM)
Random Access Memory (RAM) is where the majority of your program will live while it is actively running. As the name indicates any position in your application is capable of being addressed by the hardware. When your program is executed, it will be loaded at some starting address. This address is typically called the Base Address. The value of the base-offset differs from system to system. A technique called, Address Space Layout Randomization (ASLR), loads your program's modules at random address locations to make hacking a bit more difficult.
RAM addresses start at zero and reach whatever limit is imposed by the system on which you are running. However, not every address is accessible by your program; some areas are reserved for the operating system. The hardware and operating system work together to abstract the details for accessing locations in RAM. Therefore, RAM can be thought of as one continuous linear array of bytes. Let this be basic representation of the layout of RAM for this discussion.
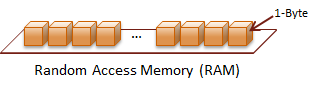
All of the sections described below are located in RAM.
Segmentation
Systems that utilized segmented RAM started to appear in the 60's with operating systems written with higher level languages. Originally, segmentation provided many services such as creating the ability address memory address higher than the word size of the processor. For Windows developers, the FAR specifier is a remnant of the limited ability to access addresses on 16-bit Intel chips, such as the 80386.
Now, the primary feature implemented with segmented memory is memory paging (segment) and virtual addressing. I do not want to get into the technical details regarding virtual memory here, but I can revisit that topic in the future. For now, realize that these features allow the system to store and order all of the active resources in the most efficient way possible while hiding the details from the programmer.
From this point on, I will call a memory segment a page. A page is a pre-determined number of bytes that are considered a single group. Memory is most efficiently managed as pages. All of the modern architectures that I have worked with have used a page size of 4Kb (4096 bytes). Why stop there? Because 4097 bytes would have been just too many?!
Now that memory segmentation has been introduced, let's alter the representation of RAM just a bit to simplify the illustrations. This new abstraction will help us visualize the concepts in a more manageable way:
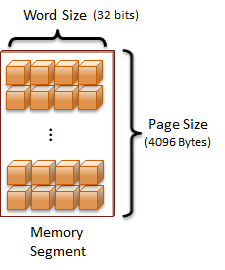
Program structure
The descriptions that I give below are in general terms because there are subtle nuances between the different executable formats defined on each platform. For instance:
- Unix/Linux:
- COFF is an older format
- ELF is the current format
- Mac OS X:
- Mach-O
- Windows:
- NE, derived from DOS formats for 16-bit Windows
- PE, 32-bit Windows
- PE32+, introduced for 64-bit Windows
While the actual file definitions vary between different platforms, executable programs are generally organized with different memory sections as described below.
Program header
There are basically two types of sections to consider when discussing executable file formats: 1) Read-Only segments, 2) Read-Write segments.Why isn't the entire program just made Read-Only, we don't want the program to be changed do we?
The actual file the program is store in is not used directly. The program header directs the loader to the different segments, which are described below.
Read-Only
The Read-Only segments can be loaded into shared memory of the current system. Therefore, space can be saved when multiple instances of the same module are executed.
Read-Write
Each Read-Write segment must be given its own copy relative to the process that uses it. These segments cannot be safely shared between processes unless special care is taken by the developer.
Section header
Each type of program segment is described below. I will indicate whether it is typically a read-only or read-write segment, as well as the role it plays in the execution of the program. Most module formats do not restrict the segment types to a single instance. I will describe some of the possibilities in the relevant sections below.
.text (RO)
Another name used for this segment is the code segment. This is where the sequence of hardware commands are encoded sequentially to command the processor. It is important for this segment to be loaded into a read-only region of the system's RAM to prevent self-modifying code. Self-modifying code is extremely difficult to debug, and it creates a great potential for security vulnerabilities.
It is also important to mention that most systems require memory segments to be marked with the "executable" privilege in order to process the segment as executable instructions.
.rodata (RO)
Some file layouts include a read-only data section to store constants and other read-only data that needs to reference an address by the program. This segment type is found in the ELF format. Again, this segment type is not used in all program file formats.
.data (RW)
The data section contains pre-allocated storage space for all of the global and static variables defined in your program. These values are packed efficiently for the target platform so they can be accessed on the proper memory boundary for the size of the data type. The commands generated in the .text segment reference the values in this segment at a relative offset during run-time. First the address of the segment is found, then the relative offset of the desired variable is accessed as needed.
A program may want to define multiple .data segments to create a simple mechanism to share data between two processes. This is called a shared data section. I have only used this technique in Windows, so I do not know the specifics for its use on other platforms.
The shared segment is loaded into globally accessible system memory. Any process that loads this module will have access to the same variables. If one process changes a value, this will be instantly reflected in all other processes. I have used this mechanism to synchronize unique data among different programs on a single system.
.bss (RW)
The .bss section is unique compared to the other segments. There is only one .bss per module, and it is not actually included in the module. That is because the .bss is the segment where all of the uninitialized data fields of a module are located.
The size required to store the uninitialized fields is all that is required in the definition for the .bss. The initialized fields defined below would be placed in the .bss address space:
C++
int classId; | |
char courseName[32]; | |
std::vector< student > classRoster; | |
| |
// Static member variables and local static variables | |
// will also be allocated in the BSS. |
Runtime Structure
Now that we have defined each of the major types of segments that exist in all modern computer architectures, let's describe how they are structured in a running program. There are three types of memory that are directly referenced by machine instructions.
Heap
The Heap is where all dynamically allocated memory is located. Another name for this collection of memory is the Free-Store. The heap is essentially all of the remaining accessible RAM that isn't used by your program modules or isn't reserved for the stack.
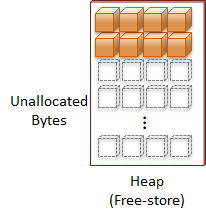
Call-Stack
The Stack is a nickname for the Call-Stack. The call-stack is where parameters are passed into functions and storage is allocated for local variables. That is why it is referred to as "creating the variable on the stack". A stack-frame is used to represent each instance of a function call. Each time a function is called, the current function state is recorded at the current location on the stack, and a new stack-frame is pushed onto the stack to track the next function. When a function call returns, the current stack-frame is popped off the stack, and the previous function state is restored to continue execution.
One call-stack is allocated for each thread that is started in the program. In order to efficiently use the available address space on the system, a stack-size is usually defined for each thread's call-stack. Factors that you want to consider when selecting the size of your call-stack is the size of the local variables created in your functions and how deep your function calls execute.
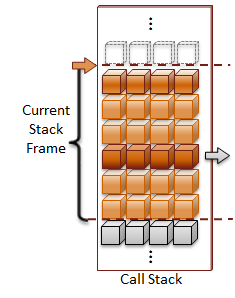
I am going to leave the specific details to how the call-stack is managed for a later post; because call-stack processing is a complex topic that requires an entire post on its own. What is important to understand for now is that function call management and local variable allocations are the primary responsibilities of the call-stack.
System Registers
The hardware registers are memory locations that are actually housed within the CPU. The registers are the same size as the word-size for the CPU. Word has taken on a different meaning over the years with computers. In the context of hardware, word-size always means the bit-width of the processing pipeline of the CPU. For instance, the word-size on a 32-bit processor is 32-bits, and the word-size for a 64-bit processor is 64-bits.
They are crucial to the structure of a computer system. The registers are the CPUs only way to operate upon the values when a command is executed. Values are loaded into the registers from addressable RAM locations via the system bus. If the CPU has an internal memory cache, large chunks of data can be pre-loaded from RAM. This will ensure the data is ready when the CPU is ready to process an instruction. The CPU cache can provide an enormous boost in performance.
Fundamental x86 and AMD64 Registers
The types of registers that are available depend upon the CPU's ISA (Industry Standard Architecture). I am going to briefly introduce the commonly used registers for the x86 ISA, because all three major desktop operating systems (Apple, Linux, Windows) support this platform.
There are eight general purpose registers and the Instruction Pointer, which holds the program counter. The registers are named based upon a purpose that was originally envisioned for each register. There are special operations that are designed for specific registers; such as the Accumulator, EAX, has an efficient opcode to add a byte index specified for it. However, the other registers support these operations as well; only the opcodes are longer general-purpose commands.
| 16-bit | 32-bit | 64-bit | Purpose | |
| AX | EAX | RAX | Accumulator | |
| BX | EBX | RBX | Base index (arrays) | |
| CX | ECX | RCX | Counter (loops) | |
| DX | EDX | RDX | Extends the precision of the accumulator | |
| SI | ESI | RSI | Source Index for string operations | |
| DI | EDI | RDI | Destination Index for string operations | |
| SP | ESP | RSP | Stack Pointer | |
| BP | EBP | RBP | Base Pointer | |
| IP | EIP | RIP | Instruction Pointer | |
The first four registers of the previous table have additional registers defined to access the low-order and high-order bytes of the 16-bit register. The x86 and AMD64 instruction sets use an 8-bit byte. Here are their names:
| 16-bit | Low Byte | High Byte | ||
| AX | AL | AH | ||
| BX | BL | BH | ||
| CX | CL | CH | ||
| DX | DL | DH |
The stack-pointer typically points to the top of the call stack to indicate the next address to use for parameter passing or local variable allocation. The instruction-pointer points to the address of the current instruction to execute. This address should always be pointing to an address that is found in the .text segment of your program, or the system's libraries.
Interactions
Ignoring restrictions due to permissions, RAM can be addressed as one continuous sequence from the lowest address to the highest address. The system will move segments in-and-out of RAM one page of memory at a time. There are typically regions of the address space that is reserved for the operating system (kernel). If shared memory between processes is allowed on the system, then a region will also be reserved for globally accessible address space.
Your program itself is loaded into available address space. There is no universally common addressing scheme for the layout of the .text segment (executable code), .data segment (variables) and other program segments. However, the layout of the program itself is well-formed according to the system that will execute the program. This allows the system's program loader to navigate the program file and properly load the program into RAM. Jump tables and other internal structures are fixed up to allow the different memory segments to be properly referenced based on their final address.
The diagram below depicts a simplistic view of a single program's elements loaded into memory on a system. The CPU accesses the RAM through the system bus.
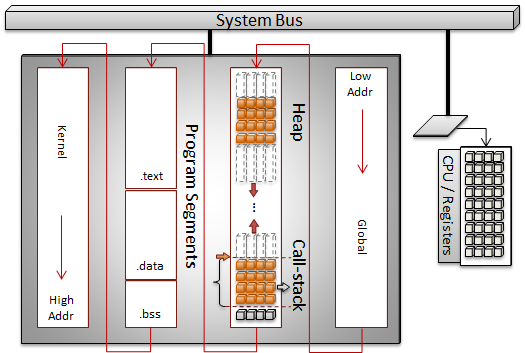
The call-stack and heap are usually situated at opposite ends of the address space and they grow towards each other. If the program allocates too much dynamic memory, or a recursive call continues unbounded the system will run out of address space. For the recursive function call scenario, the stack will have used all of its allotted space and cause a stack-overflow.
The only hard boundaries in this continuous address space is typically at the page-level. Therefore if an operation attempts to access memory across a page boundary a segmentation-fault or segfault will occur. If permissions are set to restrict access to specific pages and a program attempts to access the space, some type of access violation is raised.
Summary
Most programmers do not need to have a deep understanding of a computer's memory architecture in order to complete their jobs. However, having a solid understanding of this memory model can help you make better design decisions and improve your debugging skills. As you move closer to the hardware in your development, it becomes more necessary to truly understand this structure. Finally, there are some tasks that are simply not possible to accomplish (or at least them become extremely difficult) if you do not have a clear picture of the memory structure for computers.
Security is one of the concepts with computer programming where it becomes necessary to have a better understanding of this structure. Even though you may never look at a disassembled program or manually access the registers, it is important to understand how what causes a security vulnerability, as well as the qualities that make a vulnerability exploitable. So with this foundation of memory structure, I will be able to write about secure programming practices and also demonstrate some of the techniques used to exploit these flaws.
The criticism of strong-encryption by law-enforcement has been an interesting topic to follow in the news and politics for the last nine months. It became even more interesting in February when the short-lived court battle between Apple and the FBI made headlines. Now looming on the horizons is a piece of legislation that proposes to give judges the authority to order makers of products with encryption to help law-enforcement.
Why can’t these companies help law-enforcement and give them a backdoor that they can only get the keys with a court order?
A Word about Encryption
Message encryption has existed for millennia, primarily used for communication in the military. It is now a ubiquitous tool of the Information Age and the Internet. Encryption is a versatile tool that goes well beyond privacy services such as online banking, the protection of personal medical records or even the end-to-end message encryption recently added to WhatsApp. Encryption techniques are also used to create digital signatures to verify our digital content has not been tampered. Both aspects are fundamental to computer security.
How does encryption work?
Math is Hard
Specifically, for a computer to efficiently factor extremely large integers and to compute discrete logarithms. These problems are considered “intractable” or hard to deal with. They are difficult problems that cannot be solved quickly. Other types of encryption rely on concepts learned from information theory, computational complexity and statistics.
Essentially, an encryption algorithm is a set of instructions that scramble a plain-text message so there is no discernable pattern. Statistically, it should look like a truly random sequence of numbers, noise. The scrambled message is called a cipher message. There is also an algorithm that is used to decrypt the cipher message.
To make encryption algorithms more useful, a key is used with the algorithm to modify the scrambling instructions in a way that is unique to each key.
It takes relatively little time for a computer to encode and decode a message with an encryption algorithm and the associated key. However, the intractable math problems and encryption concepts used to design the algorithm make decryption take a very long time without the key.
This reddit comment [^] calculates the time required to crack an AES 256-bit message at 9 e50 years. To put this in perspective, the universe is believed to be 14 billion (1.4 e10) years old.
What’s the take-away from all of this?
It is far simpler and faster to search for a vulnerability in the system that employs encryption than it is to attempt to brute-force crack a message.
Well, demanding that a backdoor be engineered into products that are normally secure is also faster and simpler than a brute-force attack.
Why Can't We Give Them a Backdoor?
Vulnerabilities are regularly discovered in computer systems. The chances are that there are vulnerabilities in the system. It may not be with the encryption algorithm itself, but it may be with how the keys are transferred, or how the data is copied. Creating a secure system is difficult even when we aren’t trying to create backdoors in the system.
In fact, the National Vulnerability Database (NVD)[^] reports an average of 19 new vulnerabilities were reported each day in 2014. At the time of this writing, NVD vulnerability workload index workload index[^] was 4.62. This is a calculation of the number of important vulnerabilities that information technology operations staff need to address each day.
It seems as though there is no need for a backdoor.
Now these vulnerabilities are spread across a wide variety of networked systems, software and devices. So it is not likely that a new vulnerability is discovered for your iPhone or Android device each day. Moreover, it is likely that many vulnerabilities only become exploitable when you combine two specific systems configured in specific way. Otherwise they would be considered to be secure by themselves.
It is difficult enough to secure the systems that we have when we intend for them to be 100% secure. Imagine what happens when we start adding secret access methods to these designs. Once the secret access method is uncovered by less than honorable groups, the secret access feature becomes the front door… with no locks … a huge welcome mat out front… and a note on the door that says “Let yourself in and make yourself comfortable.”
Summary
So, we actually can add backdoors to these products, but that defeats the purpose of trying to secure a product in the first place. Networked computers cannot communicate securely over a public network without encryption. Adding an alternate method to access a computer that bypasses strong-encryption is not an acceptable solution.

Recent Comments