Pointers are one of fundamental topics related to programming that can be quite confusing until you develop your own personal intuition for what they are and how they work. Passing on this intuition is also a difficult task, because once the more experienced developer finally understands pointers, they seem to entirely forget what was so confusing in the first place.
I will attempt to pass on the intuition I have developed for using pointers in C and C++. The metaphors and explanations that I use are based on a number of attempts to help beginners struggling with concepts. Each of whom now have a better understanding of these confounding constructs. Even if you are completely comfortable with pointers, maybe I can possibly give you another approach to help better explain these fundamental tools to others.
This post will introduce pointers and the syntax for interacting with them. I will write a follow-up post that addresses more complex things that are done with pointers, such as creating data structures and using function-pointers.
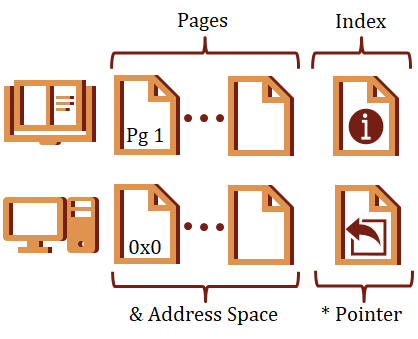
I want to start with an analogy. Think of your program as a book. The pages are like memory addresses, and the content on each page is the data.
A pointer in this context would be an entry in the index. The name of the entry is similar to the name of your pointer. This entry takes up space in the book, but the entry itself does not contain any data. Instead, it contains a page-number (address) where you can actually find the data related to this index entry.
You cannot access the data the index refers to directly from the index itself. Rather, you must first dereference the index (pointer) by navigating to the page (address) indicated for the entry.
With computers, there are two ways to reference data, directly and indirectly.
Direct references are to variables that refer to data that is directly associated with the storage location for the variable. These types of variables have been statically allocated, which means they are local variables allocated on the stack, global variables, or variables that have been declared with the static
qualifier. To keep things simple, I will only use local variables in the code examples.
Indirect references do not have storage associated with the data to be accessed. Instead, we have a variable that points to the storage location. The storage location is a memory address on the computer. Essentially, a pointer is a variable that stores a memory address. Pointers, References, and even Arrays are all forms of indirect data access. This post focuses on the Pointer.
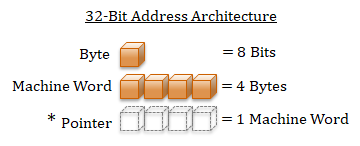
A computer address requires a value that is the size of a machine-word. The machine-word size can be deduced by the target machine's architecture. For example, a 32-bit architecture has a word-size of 32-bits. Virtually all modern architectures use an 8-bit byte. Therefore, a 32-bit architecture has a machine-word size of 4 bytes. Since a pointer is a variable that holds an address, a pointer will be the same size as the computer's machine-word.
A pointer must be initialized before it can be dereferenced. Dereferencing an uninitialized pointer is considered undefined behavior, which basically means your program won't work. There are two things that you can use to initialize a pointer, 1) a valid address in your program, 2) NULL
or 0. NULL
is defined in both C and C++, but it is generally advised to not use NULL because it is not defined portably across different systems. Instead, you should use the value 0.
One note of caution, Operating systems typically do not map data at the address 0x0. However, 0x0 may be a valid address on some resource constrained bare-metal systems. Therefore, take the time to learn the details for each system on which your programs will execute.
A new literal value for pointers was added to C++ 11 called, nullptr
. This is a safe and portable value that can be assigned to a pointer to indicate that it does not reference anything valid. If you are using newer versions of C++, this is the recommended value to assign to empty pointers..
Let's review the different types of syntax that can be used to interact with pointers. The operations include the ability to take the address-of a data location, dereference a pointer to its data location, and even accessing members of complex data structures.
The &
becomes the address-of operator when placed in front of a variable. Use this operation to create a pointer to variable. This is a fundamental operation that is used to assign indirect storage to pointers and pass local variables to functions that expect pointers.
C++
char buffer[] = "2147483647 is 2^31 - 1"; | |
char* p_end = 0; | |
| |
// Convert the text string to a number. | |
// The last character parsed is returned in p_end. | |
long value = strtol(buffer, &p_end, 10); | |
| |
long p_long* = &value; // The address where value is located | |
// is assigned to the pointer |
The *
is the dereference operator when placed in front of a pointer. This is how to access the underlying data referenced by the pointer. You must dereference a pointer if you want to access the data for both reading and writing to its indirect storage location.
C++
char* strcpy(char* dest, const char* src) | |
{ | |
// Copy each character from src into dest | |
// until the terminating NULL is found. | |
char* cur = dest; | |
// Dereference src to read its value | |
while (*src != 0) | |
{ | |
// Dereference src to read its value for assignment | |
// to the current location of the dereferenced cur. | |
*cur = *src; | |
// Advance the location pointed to by | |
// both of these pointers, i.e. next character. | |
cur++; | |
src++; | |
} | |
| |
// Copy the final NULL termination. | |
*cur = *src; | |
| |
return dest; | |
} |
Structs and classes collect a set of member data and functions into a single construct. If you have a pointer to an object and want to access one of its members, you will have to dereference the object pointer before you can access the members.
C++
struct Entry | |
{ | |
int key; | |
int value; | |
}; | |
| |
Entry* p_entry = new Entry; | |
(*p_entry).key = 1; | |
(*p_entry).value = 100; |
This syntax is a bit cumbersome. There is a member access operator that can indirectly reference their members ->
.
C++
Entry* p_entry = new Entry; | |
p_entry->key = 1; | |
p_entry->value = 100; |
Arrays provide a convenient method to refer multiple data locations through a single variable. Arrays are pointers dressed up in disguise. The same notation used to access an index in an array can be used with pointers to access an element offset from the base address of the pointer.
C++
// Allocate a block of 10 integers | |
int* p_ints = new int[10]; | |
| |
// Remember, zero-based indexing in C and C++ | |
p_ints[0] = 1; // Assign 1 to the first element, which is | |
*p_ints = 1; // equivalent to this operation | |
| |
p_ints[1] = 2; // Assign 2 to the second element | |
p_ints[9] = 10; // Assign 10 to the tenth element |
Notice how the pointer indirection is automatically handled when the subscript operator is used. To be clear, an array and a pointer accessed with the subscript operator are two different things. The array is located at the same address as the variable's storage. On the other hand, the pointer contains an indirect address to the storage. When the subscript operation is used on the pointer, its address is first dereferenced before the value is indexed. You can test this with the sizeof
operator to report these size of the variable in question.
C++
int array_ints[10]; | |
int* p_ints = new int[10]; | |
| |
size_t array_size = sizeof(array_ints); // 10 * size of int (4) = 40 | |
size_t pointer_size = sizeof(p_ints); // word size = 4 |
Although the array has storage associated with its variable, if the array is used directly without a dereference operation, the address of the array is returned. In essence, the array is a dressed up pointer. However, you cannot assign a new pointer to an array variable. When you pass an array as an input parameter to a function expecting a pointer, it is implicitly converted to a pointer. This is also true if you attempt to declare a function with a parameter that is an array. You can learn more about that from a previously written post on Type Decay[^].
Sometimes it is useful to hold a pointer to a pointer. If you wanted to declare a variable to hold a pointer to a pointer, it would look like this:
C++
char value = 0; | |
char* p_value = &value; | |
// Declare a pointer to a char pointer | |
char** pp_value = &p_value; | |
| |
// A double indirection is required to read the | |
// actual value stored at the final address. | |
char data = **pp_value; |
There two reasons that I can think of to use multiple levels of indirection. The first is to make call-by-reference functions calls with pointer variables. Call parameters for functions in C can be either call-by-value or call-by-reference. Call-by-value places the value of the variable on the call stack, whereas call-by-reference places the address of the variable on the call stack. You use call-by-reference when the called function will modify the call parameter passed to the function. In the case of the strtol
example, a pointer to the first character after parsed number is returned.
Call-by-reference is especially valuable when you have more than one value that you would like to return from a function.
Here is an example of double-indirection by a function that allocates a new buffer to copy the contents of a string. The second level of indirection is required so the caller can receive the updated value of the pointer, which points to the newly allocated buffer.
C++
// Allocate a buffer to hold a copy of the input string. | |
// The number of bytes allocated | |
size_t CopyString(const char* input, char** output) | |
{ | |
size_t len = strlen(input) + 1; | |
| |
*output = new char[len]; | |
strncpy(*output, input, len); | |
| |
return len; | |
} |
The other reason is to dynamically create an array of pointers. For that matter, even a statically allocated array of pointers has double indirection. An array of pointers could be used as a container for other dynamically allocated variables, or a function-pointer table. I will discuss function-pointers in the follow-up post to this article.
The final concept that I want to introduce in this post is pointer arithmetic. It is commonly used. It is also easy to mess up if you aren't paying attention. I think it is important to walk through this concept to help you from being surprised when you work with different pointer types in this context. The pointer type supports basic addition and subtraction, which also includes the increment ++
and decrement --
operations.
Using the subscript notation is a simply a different form of performing pointer arithmetic, followed with indirectly referencing the data at the specified index. A pointer is an indirect reference to a specific type. Whether it is to one of the fundamental types, an object or even another pointer, this referenced type has a size associated with it. Adding one to a pointer will increase its value by the size of its referenced type. Similarly, subtracting one from a pointer will reduce its value by that same size. Therefore, the subscript operator intrinsically performs the pointer arithmetic to identify the location of the index from the base pointer.
C++
int* buffer = new int[10]; | |
// ... Populate the contents of the array | |
| |
// These two statements are equivalent | |
buffer[4] = 101; | |
*(buffer+4) = 101; |
Be cautious when performing pointer arithmetic, because if you attempt to calculate an offset with the wrong type, the wrong type-size may be used in your calculation. This is most likely to happen when you are converting data between types, such as reading a message from network communication.
Finally, you cannot perform pointer arithmetic on a void*
. This pointer type is an intermediate type that must be cast to another type before it can be dereferenced or indexed.
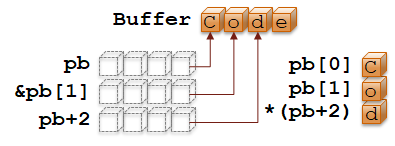
When you are wading through a morass of pointer code, I find it useful to deduce the type for variables with lots of indirection. Especially pointer logic that is iterating through the elements of a buffer.
We will deconstruct the types from this snippet of code:
C++
char Buffer[] = "Code"; // Statically allocated char array | |
char* pb = Buffer; // char* points to first buffer char | |
char b0 = pb[0]; // Dereference char* becomes char, 'C' | |
| |
char b1 = pb[1]; // Dereference char* becomes char, 'o' | |
char* pb1 = &b1; // then take address results in a pointer. | |
// Equivalent to this: &pb[1] | |
| |
char* pb2 = pb+2; // Add char slots from base pointer, | |
// results in a new pointer | |
char b2 = *pb2; // Dereference points to 'd' | |
// Equivalent to this: *(pb+2) |
Let's do one more. This time a bit more complex:
C++
// Create two strings, | |
char* pHello = new char[6]; // This one is dynamically allocated | |
strncpy(pHello, "Hello", 6); | |
| |
char pWorld[] = "World"; // This one is statically allocated | |
| |
char** ppStrings = new char*[2]; // Allocate an array of char* | |
// This is a pointer to a char pointer | |
ppStrings[0] = pHello; // Let's associate pHello with the first index. | |
// We dereference the first pointer | |
// This gives us a char* pointer. | |
// Now we can assign pHello | |
ppStrings[1] = pWorld; // The same applies to the second string. | |
| |
// For cleanup, must delete 2 allocations | |
delete[] ppStrings; // Be sure to use [] version of delete | |
delete[] pHello; // Same for pHello. | |
// pWorld was not dynamically allocated |
Pointers are essential to perform many operations in C and C++. Arrays are basically pointers in disguise. The indirect nature of pointers can lead to confusion, and the difference between the size of the pointer and the size of its type can lead to confusion. I showed in this article how you can successfully manipulate pointers by identifying the type of variable you are working with before performing any operations. In the next part, I will tackle some more complex topics related to pointers, which includes data structures and function-pointers.
]]>As part of my coursework in the pursuit of a Masters degree in Cybersecurity I took a course called Software Engineering for Real-Time Embedded Systems. The course focused on the concepts and challenges that are encountered when developing software for systems that have hard real-time deadlines for the system to function properly. The homework was a series of projects that led up to the development of a quad-copter with streaming video.
Many of the developers that I follow on Twitter have asked for resources on how to get started with embedded development. I thought this would be a great project to build and document the process for those of you that are interested in learning what is required to create one of these machines. I plan to build a general-purpose drone that is suited for aerial-photography with longer-than-average flight-times. However, the software that I develop can be adapted to all types of multi-rotor air-vehicles. This means that by changing the components such as frame and motors, you could easily build your own drone suitable for FPV racing.
There are plenty of pre-built and DIY (do-it-yourself) kits available to amateurs and enthusiasts. If I simply wanted to fly model aircraft I would purchase one of these kits and I wouldn't be writing this series. My chosen career is Software Engineering and it just so happens that is also my hobby. While I will be using the same components found in the DIY kits, I will be foregoing the flight-controller. Instead, I will be designing and documenting my journey as I develop this controller and integrate it with the drone. If you aren't interested in writing your own flight controller from scratch, you can still build a drone based on an embedded controller and use the open-source software Ardupilot. This development for this software is definitely active and contains support for many different types of air-vehicles. Alternatively, you could purchase a flight controller circuit-card that has all of the required functionality built into the hardware.
I will definitely cover all of the software aspects required to build a drone for yourself. I also plan to write some entries that will be of interest to you if you are interested in embedded development. For example, reading component data sheets, setting up interrupts and other aspects important to real-time embedded development.
A quad-copter is considered a multi-rotor air-vehicle. Other common multi-rotor configurations include 3, 6 and 8 rotors. Four rotors provides a relatively stable configuration that is symmetric and won't be as expensive as the 6 or 8 rotor configurations.
There are two other types of radio-controlled air-vehicles common with hobbyists.
These are relatively efficient craft that allow for much longer flight times. However, they typically require a large amount of setup/teardown time when moving to the flight zone, and these craft require large open areas where the craft can maintain constant forward momentum to create lift over the wings.
This is a single-rotor aircraft. The flight direction is controlled by changing the attitude of the main rotor and a secondary tail rotor is required to counteract the gyroscopic rotation caused by the primary blade.
I mentioned that a traditional helicopter requires a tail-rotor to counteract the gyroscopic rotation introduced by the primary blade. A quad-copter is subject to the same forces as its rotors spin. To counteract this effect, we will spin two of the motors clockwise and the other two motors counter-clockwise. At this point I do not know if it matters which motors that we command to rotate in each direction. Unless I find a definitive reference or someone comments with the definitive answer, this seems like something worth experimenting with when I reach that point.
This is the rotation configuration that we will start with as we work towards the final quad-copter:
We will alternate the direction of rotation for each motor
The four rotors on a quad-copter allow for a relatively stable and very maneuverable aircraft. A quad-copter has 6-degrees of freedom in movement, 1) up, 2) down, 3) left (port), 4) right (starboard), 5) forward, and 6) backwards (aft). Additionally, the craft is also capable of hovering in-place and rotating in both the clockwise and counter-clockwise directions.
A different set of terminology is used in navigation of ships and aircraft, and I will be using these terms moving forward.
This describes the overall rotation speed of the rotors. Thrust adjusts the relative speed of each rotor equally. Therefore, if the thrust is increased, the speed of the rotors will increase and the air-vehicle will ascend. Alternatively, if the thrust is decreased the air-vehicle will descend. Assuming the air-vehicle is in the air, if the thrust is left at a steady neutral position, the vehicle will hover in place. This will require the calibration and selection of the hover level for thrust. The hover level is the neutral thrust level.
This causes the craft to rotate either to the left or the right. This rotation will cause the drone the move to the side as well. To introduce this motion the two rotors on the side in the direction of the roll should be reduced, while the rotors on the opposite side are increased.
This causes the craft to move forward or backward by rotating the orientation of the craft. Again, to introduce this motion the rotors on the opposite side of the desired direction of movement should be increased.
This is the rotation of the craft around the vertical access. The gyroscopic forces of the spinning rotors are used to control this aspect of flight. Two of the rotors spin clockwise and two spin counter-clockwise. Increasing the speed of the clockwise motors relative to the counter-clockwise motors will induce a force that causes the craft to yaw to the right (clockwise). The craft moves in the opposite direction when the rate of the counter-clockwise motors is increased relative to the clockwise motors.
The list below contains a description of the components that are required to build a basic quad-copter / quad-rotor. I have also included the parts that I am using for my build.
There are many types of frames, built with a variety of materials such as wood, plastic and carbon fiber. It is important to get a frame that is light and well-balanced. I chose to work with the Tarot - IronMan 650, which is built from carbon fiber. This frame collapses easily to make it more portable. It has a solid core with two plates to protect the internal components. This frame was about 100 dollars. It is a larger frame, so it is not suited for FPV-racing. I am more interested in developing a platform that I can additional sensors to perform interesting tasks remotely.
Multi-rotor copters typically use outrunner type motors because of their high efficiency. Outrunners are a type of motor where the internal coil is mounted fixed and the entire brushless outer bell-housing rotates with the shaft, attached to the propeller. Motors are rated by a unit represented as KV. This means Kilo-rotations / Volt. Typical batteries run at 12 volts. Therefore, the 1000KV motor would rotate at a top speed of 12000 RPM.
I selected the Turnigy - Multistar Elite 4006 740KV motor for my drone. This is a slower motor at 740KV that has a larger number of magnetic poles to produce more torque. I will pair this with a steeper pitch of propeller to create a drone that can handle a heavier payload with the additional sensors that I will eventually add. The specs for these motors indicate they are capable of handling from 10" to 17" rotors. To start with, I have selected 11" carbon-fiber rotors. If you are purchasing equipment to build your own drone, I suggest you order extra rotors. Because you will break a few before you attain stable flight.
The motors are ultimately controlled by an Electronic Speed Controller (ESC). They are colloquially called "Escapes". The motor is controlled by 3 input wires, which the ESC uses to adjust the voltage across the different wires to cause the motor to spin. The controller side of the ESC has two wires that the flight controller uses Pulse-Width Modulation (PWM) signals to signal the desired speed. I will elaborate on the ESC in later posts when I describe its integration with the flight controller.
Most ESCs are designed to support a single motor. These ESCs are attached to each arm of the multi-rotor so they can connect to the flight controller in the center of the frame, and the motor on the edge of the arm. A separate ESC is required for each motor. This electronic component is one of the most important elements of your drone. So don't go cheap on this component. ESCs are rated by the current that they control. I have seen ratings in increments of 5A and 10A. I would go one level greater than the rating of the battery that you plan to use. ESCs can support additional features to protect the other electronics in your system, such as a low-voltage protector for your lithium-polymer battery. These features are often programmable.
When searching for the ESC that I wanted to use, I discovered a 4-in-1 module that is installed at the center of the drone and supports up to 4 motors. This module also has a Battery Elimination Circuit (BEC) that can be used to power a 5 volt flight-controller. I chose the Q Brain 4x25A Brushless Quadcopter ESC. I wanted to simplify the circuitry that I would have to create for the drone. I am more interested in the software that plan to write than the physical circuits that are created.
The current drones are powered by Lithium-Polymer (Lipo) type batteries. They are very dense and can store quite a bit of energy. There are a few metrics used to rate these batteries:
Lipo batteries are rated by the rate of current that can be drawn from the battery. This quality will be indicated with a "C" in the battery description. For example, a battery that is capable of sustaining a current of 10 amps will be marked 10C.
The amount of energy contained in a fully charged battery is indicated in milli-amp hours (mAh). Smaller batteries may only contain 100 mAh, while the types of batteries used to control a multi-rotor drone store between 2500 mAh to 12000 mAh. This rating typically determines the amount of flight time you will get per charge. I don't know if there is a calculation to approximate your flight times. I will be sure to post it if I run across one.
Most entry-level drones uses batteries with 3 cells. When you read a batteries rating, it will indicate the number of cells with an "S". Therefore a 3 cell battery will be described as 3S. More cells generally means more stored power to provide longer flight times or support a stronger current draw.
I will be using a Turnigy MultiStar battery rated at 5200 mAh 4S 14.8V @ 10C. note: I couldn't find an image to match the rating of the battery that I purchased. (I also didn't look that hard).
This is the most important sensor on a quad-copter. This sensor is also found in smart phones. An IMU contains a collection of accelerometers and gyroscopes to deduce the orientation and current motion of your drone. The absolute orientation of the drone can also be determined by locating magnetic North when the IMU contains a magnetometer. All of these sensors are typically packaged into a relatively inexpensive MEMS unit and integrated on a circuit board. The processor board that I selected is designed for robotics applications and it contains an IMU. If you want to use a different processor board, you can pick up an inexpensive IMU from AdaFruit.
To control the drone, you will need a radio transmitter and receiver pair. The most straight-forward solution is to simply buy a RC controller from a hobby shop or online. The transmitter is typically a controller with a channel selector and joysticks. The radio receiver is a small component that integrates with the Analog-Digital Converters (ADC) of your processor board to read the signal levels for each control.
While I initially develop my drone, I am going to use a standard 802.11 wifi network that connects my tablet to the wifi radio in AP mode on the flight controller processor board. I capture the control inputs with an Xbox 360 controller. Using this method allows me to capture useful information and display it on a display on my computer on the ground while I am testing. This wifi link will also facilitate streaming of live video once basic flight is achieved. We can go back at any point in time and integrate support for a traditional RC controller if desired.
This control board is the component that coordinates all of the information required to make a multi-rotor drone capable of flight. As I have already mentioned, many flight controllers exist and can be purchased just like all of the other components that I have mentioned. Except, that is not why we are here. We are going to explore the embedded world, and take on the challenge of developing our own flight controller.
I originally planned to use the BeagleBone Black. This is a very cool open-source prototype board that has lots of capabilities related to embedded systems development. It is very similar to the Raspberry Pi. The BeagleBoard runs an image of Debian Linux. I really enjoy working on these boards, because I can eliminate the need for setting up a cross-compiling toolchain. I compile the BeagleBoard's software directly on the BeagleBoard. I will add another post soon to help get you started with this platform.
Finally, this board requires a 5v power-supply. When I first assembled the drone, this configuration was great, in that I was able to use the 5v BEC from the ESC controller to power the Beagle board. But then...
I discovered the recently released (March 2017) BeagleBoard Blue. This is a version of the board is specifically designed for robotics applications. It contains an embedded IMU, and a wifi radio. This meant that I would no longer have to integrate those two components into the drone as they would be contained within this single board. However, this board requires a 12v power supply, or a 2 cell battery. I will be powering the flight controller with a separate 2 cell battery.
That covers the basic concepts of a quad-copter and hardware that I plan to start with. The next few posts will focus on getting started with the BeagleBone processor board and developing basic electronics projects. This will set the stage to integrate all of the components I described in this post. The final goal is to have a working quad-copter with supporting software that is ready to be expanded for custom purposes. The software will be available from GitHub. So if you are interested, check back soon. Follow me on Twitter to receive tweets when I post new updates.
]]>I haven't yet decided if I think this is a universal flaw among people or that it is a trait more prone to the practitioners of our profession; I am referring to the absolute mentality that so many people seem to use when making decisions. This is a closed-minded approach to solving problems. This is the basic concept:
"There is one absolutely best practice, and you are an idiot if you don't subscribe to the same approach that I take."
It is important to leave your comfort zone to expand your abilities. You can increase your potential by learning to spot this cognitive bias, recognize when you are limiting your potential by falling prey to it, and learn to evaluate objectively as you make decisions in your day-to-day activities.
I do think Ignorance is Bliss in many ways. When you are unaware of politics, current world conflicts, or the unfair business practices of large corporations, there is less for you to worry about. In most cases, you couldn't do anything to resolve these issues by yourself anyway. Regardless, this post is about something a bit more focused, willful ignorance.
Willful ignorance is what I believe most people mean when they call someone else ignorant. Ignorant by itself, simply means "lack of knowledge, education or awareness." It's not an inherently negative state of being. We are all ignorant of programming concepts when we first start our careers. Along with "best" practices, the "best" tools and the "best" coding styles. As we learn skills and become informed, we shed that state of ignorance and become capable of making more informed decisions for our daily activities. However, to reach this point requires a conscious active effort to increase one's knowledge. Willful ignorance is when a person actively stops acquiring new knowledge.
I will admit that I have trapped myself in that state of being before, multiple times actually. The first occurred when I first started programming and I reached a level of skilled commonly referred to as "Expert Beginner". This is that level when developers are quite dangerous. They are capable enough to accomplish things, but still quite ignorant of the world of computing. I remember feeling all-powerful. I mean, just a year earlier I knew zero programming concepts and now I could program in multiple languages and I was even commanding a computer to drive CNC milling machines. Also, consider that I had no difficulty developing code for the same type of problems that were disguised in different forms. I stopped running into new challenges, and mistakenly believed there wouldn't be any others.
It took a mix of observing other co-workers exhibiting similar behavior and the exposure to more complex concepts in my college courses to realize how little I actually knew. It's an easy trap in which to fall prey and it doesn't have to be permanent. It wasn't for me because I was actively pursuing knowledge and continued to seek growth. I will describe the other time I became ignorant of better ways later in this post.
A limited perspective provides limited choices.
It's that simple.
Have you ever run across a piece of code that just didn't seem to fit? Or you are trying to put together a solution but everything you try feels like it should be much simpler than your solution? That may be your intuition trying to guide you to that simpler solution. Since you don't currently see any better solution, take a step back. Go for a walk even.
While on your walk, don't think about the problem. In fact, don't think about any problems. Let your mind wander and relax. You may find that idea your intuition had in mind bubbles to the surface before you make it back to your desk. If not, no worries. With a clear mind, return back to your problem and seek out a new perspective.
I believe it is important to experiment, especially as a programmer. Hopefully you are able to find the time to explore here and there, to discover different approaches to solving problems.
Create a prototype solution the next time you design a feature. This is how you can explore the possibilities without giving up your nights and weekends. This will also give you a better understanding of your solution when you are ready to implement the real solution. You may think that you are too busy. Try it! You will surprise yourself.
This code truly should be proof of concept. Quick and dirty to test the feasibility of an approach. To help with this, consider using a different context for naming your objects to make it less tempting and convenient to paste your prototype into your production implementation. I will often create my prototypes in a unit test harness. This allows me to create multiple, small test scenarios to use my prototype while I try to understand the problem space.
Prototypes also give you the opportunity to experiment with features of a language or a library of which you recently learned. You should spend a minimal amount of time experimenting to determine if there are merits to this feature for your current problem. If it turns out to be a good fit, fantastic! However, even if it is not a good fit for your current problem, you may gain insight to the types of problems you could solve with this feature in the future. Most importantly, don't view prototype development as wasted time and effort. Even if your prototype fails to provide value, you have still learned something and gained experience; that is invaluable.
It's no coincidence that I embraced prototyping when I started to embrace the concept of unit testing with a test framework. Unit test frameworks provide a harness to execute and observe your prototype code. If you have setup your environment so that creating new test harnesses are effortless, it becomes effortless to explore ideas in the form of prototypes. Another advantage of this approach is that the code remains segregated from your main project. Therefore, the temptation to incorporate this experimental code into your main project is minimized.
Starting a new programming solution from scratch is an exciting prospect. You get to work from a clean slate, and create your solution. Working in a codebase that was written by someone else. Well, that just sucks. However, there's much to be learned from an existing code base. Especially if the program works.
If the program works, that means the previous developer did something right. It's easy to jump into unknown code and criticize it.
"What the hell where they thinking?"Consider this, what are you possibly missing? Although the software may not be perfect, it probably has some redeeming qualities. For legacy code, these qualities may be hidden beneath the years of maintenance additions that have compromised it's original architectural integrity. So how does it work? Learning to read and understand new code is extremely valuable.
Pro Tip:It's easier to understand new code if you don't judge it while you are reading it.
If you find it difficult to not judge the code in which you are stuck working, then spend a little time dissecting and understanding an open-source library that you admire. For example, something from Boost.org. Take a little bit of time to play around with the library. Possibly even create your own simplified version of it, while emulating the techniques used to implement the library.
The key theme in all of these techniques are they are different ways to practice and explore something new.
There is are no silver bullets, or killer strategies that will always work. Best practices, sure. These are strategies that usually lead to successful implementations. But remember they may not provide for the optimal solution, or even a useful solution. Best practices are the greatest common denominators for practices to guide developers that range from expert-level all of the way to beginner.
Use a healthy dose of skepticism for every guideline you apply to your code. Generally, the guideline is valid and should be used. That is, until it's not.
The other time I realized that I had become an expert beginner, was just a few years ago. I have had the opportunity to utilize a wide variety of algorithms after nearly two decades of programming. What I found, was that I basically resorted to the same small set of algorithms and data structures. That's because they were good enough. The problem is they were good enough for most situations. Because I had acquired a small list of algorithms that I depended on, I ignored all of the other possibilities that existed.
I returned to college to work on a masters degree. The program I chose had a required class "Foundation of Algorithms". I thought this will be boring because I took this as an undergraduate. I also considered getting a waiver for the class. I am glad that I didn't, because it opened my mind and reacquainted me with many of the concepts that I had tossed aside. I still go to my favorite list of algorithms, but not before considering the criteria required to solve the problem at hand.
As an example, consider the binary-search tree (BST). The red-black tree is a great implementation of this data-structure because it is self-balancing. Therefore, you have a solid general purpose binary-tree that gives you O(log n) performance for search, insert, and delete. Many implementations of the C++ Standard Library use a red-black tree to implement the std::map
.
There is another type of self-balancing BST called, AVL tree (AVL are the initials of the authors). This tree also provides O(log n) performance for the three main operations of a BST. One is just as good as the other, right? The difference between these two trees is in how the tree is balanced. The AVL tree uses a stricter algorithm that keeps the height of the tree to a minimum. Therefore, it performs better in situations that rely heavily on search operations.
The red-black tree is still the better data structure for general-purpose use, because the balancing algorithm is more efficient than AVL's algorithm. This high-lights the trade-off that we need to make when selecting between the two data-structures. If our data is typically loaded once, then primarily searched, the AVL tree would be the better choice. However, if the data in the tree is fairly dynamic with insertions and deletions being at least as likely as a search, then the red-black tree will be a better choice. Of course, if the data-set remains small, then they type of tree may not matter at all. Each situation is unique, and should be analyzed.
Selecting the best algorithm becomes a set of choices between the trade-offs. In my case, I quit analyzing the situation and simply reached for the correct class of algorithm.
This led me to the realization that lists of best practices or development methodologies are designed to guide developers to a good solution in most circumstances, without the requirement of giving much thought. "Just follow the steps down the path, you'll know when you get there..."
For a while, I thought this was a good thing. Someone has distilled this list of best-practices so I don't have to think about the minutiae, I can focus on the problem at hand. The problem is, we tend to lump all types of development together. What works well for website development probably will not be compatible with development of embedded hardware in highly regulated industries. And as these two types of development diverge to their extremes, the differences only become greater, e.g. high-demand websites on distributed server-farms vs. safety-critical embedded controllers for commercial aircraft.
Another way this manifest itself is with methodologies, such as the Agile method. Actually, not the Agile method itself, but how it is practiced, very rigidly. The point of being agile, is to being open to adapt to changes gracefully. It may be that a certain aspect of the SCRUM process does not fit well with the team or the way products are developed at your company. You should evaluate what doesn't work and modify it for your needs, or possibly even eliminate it. Strictly adhering to a process because that's what the expert's say is, well... willfully ignorant.
Originally, I started this post as a rant against the absolute mentality that many people use with work and maybe even life. Then as I wrote, I thought it would be more constructive to help others identify this mind trap, and avoid it. It happens to all of us. The thing is, you don't have to stay in that spot. Following guidelines or a methodology are not excuses to mentally checkout. If something doesn't make sense, try to understand it and change it if necessary. Otherwise, you run the risk of becoming an expert-beginner with no path for growth.
]]>